Quantcast
Channel: Sasank's PeopleSoft Log
Viewing all 132 articles
Browse latest View live

Branding 8.54+ - Role Based Theme Assignment/Override

$
0
0
In the past, I have written about Branding PeopleSoft applications using themes (and even theme macro sets in PeopleTools 8.55). In this post, I want to quickly show how we can assign different themes to different users based on roles/permission lists.

Using the steps detailed in my previous post - PeopleTools 8.55 - Branding, I created two different themes (Red and Blue).

Note:
Although, I am using PeopleTools 8.55, the same - User Attribute Based Theme Assignments - can be done using PeopleTools 8.54 themes as well.

The two themes have the following look and feel. I only updated the background color of the header to keep the themes simple. The idea is to demonstrate role based theme assignment/override. You could follow my other branding posts and make further theme changes as per your requirements.

Blue Theme:


Red Theme:


Environment Details: CS 9.2 PUM Image 2, PeopleTools 8.55.06

Assigning Branding Themes based on User Roles:

Branding System Options:

PeopleTools > Portal > Branding > Branding System Options

I left this as default for the sake of this proof of concept.


Assign Branding Themes:

PeopleTools > Portal > Branding > Assign Branding Themes


Again, for the purposes of demonstration and simplicity, I am using the delivered DEFAULT_THEME_FLUID theme as my default. Notice the 'Effective Date'? This means that we could potentially have certain themes only active for a specific period of time. For example, creating a football based theme specifically for students that is only effective during game week?


Further, you can see that I set the priority of the Red Theme higher (100) than the Blue Theme (200). This means that if a user has both CSK_RED_THM_ROLE and CSK_BLUE_THM_ROLE, the system would prioritize CSK_RED_THEME_FLUID as the user's theme.

Results:

User without CSK_RED_THM_ROLE or CSK_BLUE_THM_ROLE (Default):

This is a scenario where the user does not have any of the roles defined in the 'User Attribute Based Theme Assignments' section. The user simply gets the 'Default Theme'.


User with access to CSK_BLUE_THM_ROLE:

This is a scenario where the user has the role CSK_BLUE_THM_ROLE but not CSK_RED_THM_ROLE. So, the system assigns the CSK_BLUE_THEME_FLUID theme for this user.


User with access to both CSK_RED_THM_ROLE and CSK_BLUE_THM_ROLE:

This is a scenario where the user has both CSK_RED_THM_ROLE and CSK_BLUE_THM_ROLE. The system uses the priority configuration and assigns the CSK_RED_THEME_FLUID.


PeopleBooks Reference:
PeopleTools 8.54
PeopleTools 8.55

Fluid UI - Oracle JET - Using Oracle Alta UI and Flex Layouts

$
0
0
In my previous posts, I showed how we could use Oracle JET with PeopleTools (and client side javascript) to take advantage of some robust solutions for file loading and modularity. Since I started attending the Oracle JET MOOC, I wanted to see if we could leverage Oracle JET for enhancing the UI in PeopleTools Fluid. Why would we want to do that? Well, why not? Oracle JET has a very well documented CookBook and pre-built UI components, so we could just plug and play the UI functionality to Fluid (without reinventing the wheel). Sounds good in theory! Let us see how we could use Oracle Alta UI and Flex Layout (part of CSS3) in Fluid as a starting exercise.

Development Environment: HCM 9.2 PUM Image 17 - PeopleTools 8.55.03

Step 1: Install the latest version of Oracle JET

As I have shown in the past already, Oracle JET is available on the web server starting with PeopleTools 8.55. This is great for using requireJS, JQuery and other libraries (that are part of Oracle JET), but if we want to venture into the UI layer, it is better to install the latest version of Oracle JET to take advantage of the newer capabilities (since the delivered version - at least as of PeopeTools 8.55.06 - is still referencing a much older release).

I used bower to automatically download, install and place the latest version of Oracle JET to my bower_components folder which is mounted on my web server. For more details on how to use bower, please refer - Using Bower to manage javascript packages in PeopleSoft Applications.

Oracle JET Installation:


Oracle JET 2.1.0 on the web server (bower components):


Note: You don't necessarily have to use bower for placing Oracle JET on the web server. You could use other options that might be convenient and accessible to you.

Step 2: Create a simple Fluid Page using PSL_APPS_CONTENT Layout Page

There is nothing fancy about this page (at least as of now). It is basically empty right now.

Fluid Page Object - App Designer:


Fluid Page:


Step 3: Inject Alta UI CSS to the Fluid Page

I am using the Page Activate PeopleCode event to execute an OnLoad javascript which will take care of loading the Alta UI CSS file located on the web server (Oracle JET directory).


JavaScript: CSK_OJ_LOAD_CSS


You can see that I am adding the oj-alta-notag-min.css instead of oj-alta-min.css. This is to avoid conflicting with some of the other basic PeopleSoft styles. For more details review - Understanding Oracle JET Theming For Compatibility.

Note: For more details on the cskLoadCSS function, refer PeopleTools 8.55+ - Using Oracle JET (JQuery, JQueryUI, requireJS and more) - Part 3.

Result:

We can now see the oj-alta-notag-min.css file injected to the head when 'oj Layout' page is loaded.


Step 4: Use Flex Layout in Fluid

Now that we completed all the logistics, we are ready to start using the 'Flex Layout in Fluid'.

Let us add a few group boxes to the Fluid page that would provide us a mechanism to add 'Layout Only DIVs' to the page which would in turn allow us to use the Oracle JET - Flex Layout styles.


oj-flex Group Box Properties:

You can see that in the Group Box Properties, I have set the 'Override PeopleTools Style?' to Yes. This is required specifically for these type of use cases where we use CSS from external libraries. Otherwise, there will be other undesired PeopleTools styles automatically added to this DIV. Also, we need to make sure that we set the Group Box Type to 'Layout Only' and Html Tag Type to 'DIV'. The Default Style Name (oj-flex oj-sm-only-flex-direction-column) was directly copied from this lesson: Oracle JET MOOC: Lesson 1, Part 10 - Oracle JET Layouts - I recommend reviewing this video to get a good understanding of Alta UI and Flex Layouts.


oj-flex-item Group Box Properties:

Default Style Name: oj-panel oj-margin oj-flex-item


Results:

Let us now see this in action and also compare it with the same Flex layout implemented in an Oracle JET Quick Start Template.

Watch Demo Here:Oracle JET Quick Start Template Demo

Watch Demo Here:Fluid UI - Flex Layout Implementation

Step 5: Adding Fluid Elements to the Flex Items

What is the benefit of all these steps? We are using a well documented, stable set of responsive styles and UI components delivered by Oracle JET instead of developing them from scratch. Let us see it in a more realistic use case. Let us add some Fluid elements (input fields) to the Flex Items.


Group Box Properties:


Input Field (Edit Box) Properties:


Note: I repeated the same elements in the other two flex items.

Results:

Watch demo here:Fluid UI - Flex Layout Implementation with Input Fields


Fluid UI - Oracle JET - Using KnockoutJS for Data Binding - Demo

$
0
0
Continuing on my experimentation with Oracle JET in Fluid UI, I will demo how we can use KnockoutJS available as part of Oracle JET for data binding. This demonstration is based on the following Oracle JET MOOC - Lesson 1, Part 4: Data Binding.

Development Environment: HCM 9.2 PUM Image 17 - PeopleTools 8.55.03

Step 1: Create a Fluid Page

I created a simple Fluid page - CSK_KO_DATA_BIND - using PSL_APPS_CONTENT layout. I added a couple of group boxes for creating a flex layout (oj-flex and oj-flex-item). Adding the flex layout is optional but you can refer to Fluid UI - Oracle JET - Using Oracle Alta UI and Flex Layouts for more details.

Further, I added the following page field elements (group box, edit box - input field and edit box - display only):


Group Box Properties:


Edit Box (Input Field):


Edit Box (Display Only):


Step 2: Add KnockoutJS path to requireJS configuration

I updated my global requireJS configuration to include the path for knockout.


For complete javascript code, refer jsFiddle link: CSK_REQUIRE_CFG_JS

For more details on using requireJS refer:PeopleTools 8.55+ - Using Oracle JET (JQuery, JQueryUI, requireJS and more) - Part 1, Part 2, Part 3, Part 4.

Step 3: Add data binding to the View (Page HTML)

In our infrastructure (PeopleSoft - Pure Internet Architecture), the "View" is the page (CSK_KO_DATA_BIND) HTML. I wrote some PageActivate PeopleCode to add the data-bind attributes to the Fluid page fields using the Field Class HtmlAttributes property.


PeopleCode for Reference:
/* Setting the data-binds in the "View" */
CSK_OJ_WRK.DESCR1.HtmlAttributes = "data-bind='value: userText'";
CSK_OJ_WRK.DESCR2.HtmlAttributes = "data-bind='value: userTextCaps'";


Step 4: Apply the KnockOut Bindings to the ViewModel

I updated the PageActivate PeopleCode to include a javascript object (CSK_KO_MAIN_JS) on page load. This javascript will serve the same purpose as a traditional 'main.js' in the javascript/Oracle JET architecture.


JavaScript: CSK_KO_MAIN_JS


- As you can see, I added the path to the "ViewModel" javascript in CSK_KO_MAIN_JS instead of using the global requireJS configuration that we used in Step 2 for Knock JS. The reason being, I did not want this app (page) specific path to clutter my global requireJS configuration.
- In my require block, I injected the Alta CSS to enable the oj-flex and oj-flex-item styling that we used in Step 1.
- Finally, I am applying the Knockout binding to the "ViewModel" which resides in CSK_KO_VIEWMODEL_JS.

Step 5: Create ViewModel JavaScript Object - CSK_KO_VIEWMODEL_JS

JavaScript: CSK_KO_VIEWMODEL_JS


The ViewModel has the define block as described in the Oracle JET MOOC lesson.

Results:


Fluid UI - Using Oracle JET - UI Components - Visualizations - Status Meter Gauge

$
0
0
While exploring the use of Oracle JET to enhance the UI capabilities of PeopleSoft Fluid, we saw how we could employ basic responsive layout/styling (Alta UI css) and data binding (KnockoutJS) functionality.

Based on what we learned so far, does it appear like PeopleTools natively (via App Designer) support Oracle JET? Probably not. But are there enough built-in functions/tools/workarounds to integrate Oracle JET with Fluid UI? Yes, yes and yes!

In this post, I will demonstrate how we can integrate an Oracle JET - Visualization Component (Status Meter Gauge) in a Fluid page to enrich the UI (more than what we could normally achieve within the confines of App Designer). By the way, this post is inspired by the Oracle JET MOOC - Lesson 2 - Part 2: Data Visualization Components. I highly recommend watching the video to get an understanding of the Status Meter Gauge. We will try to replicate the following behavior demonstrated on an Oracle JET QuickStart Template website (see oj Module section in the below animation).


Development Environment: HCM 9.2 PUM Image 17 - PeopleTools 8.55.03

Assumptions: For the purposes of this demo, it is assumed that the latest version of Oracle JET is installed on the web server.

Step 1: Add Oracle JET paths to requireJS configuration

If we work with the Oracle JET QuickStart Template (especially using NetBeans), we will realize that the entire framework to develop and run Oracle JET applications is pre-configured for us. So there is not much we have to do other than plug and play the modules, components, etc.

As part of the pre-configured framework, the requireJS config for the QuickStart Template can be found in the main.js:


Because we are trying to wire this into the PeopleSoft architecture, we need to make sure the Oracle JET related libraries are added to the requireJS path configuration. So, let us update our global requireJS configuration to include the following Oracle JET paths.

        'knockout': cskBowerCompsPath+'/knockout/dist/knockout',
        'ojs':cskBowerCompsPath+'/oraclejet/dist/js/libs/oj/debug',
        'ojL10n':cskBowerCompsPath+'/oraclejet/dist/js/libs/oj/ojL10n',
        'ojtranslations':cskBowerCompsPath+'/oraclejet/dist/js/libs/oj/resources',
        'promise':cskBowerCompsPath+'/es6-promise/promise.min',
        'ojdnd':cskBowerCompsPath+'/oraclejet/dist/js/libs/dnd-polyfill/dnd-polyfill-1.0.0.min',
        'jqueryui-amd':cskBowerCompsPath+'/jquery-ui/ui/minified',
        'signals':cskBowerCompsPath+'/js-signals/dist/signals.min'

For complete javascript code, please refer jsFiddle link: CSK_REQUIRE_CFG_JS

Note:

- The library paths for Oracle JET (installed using bower or direct download) might not be the same as what we normally find in the Oracle JET QuickStart Template. Please make sure the paths are referenced appropriately.
- For more details on using requireJS refer: PeopleTools 8.55+ - Using Oracle JET (JQuery, JQueryUI, requireJS and more): Part 1, Part 2, Part 3, Part 4

Step 2: Create a Fluid Page

Let us create a simple Fluid page - CSK_OJ_GAUGE_DEMO - using PSL_APPS_CONTENT layout. And add a couple of group boxes for creating a flex layout (oj-flex and oj-flex-item). Adding the flex layout is optional but you can refer to Fluid UI - Oracle JET - Using Oracle Alta UI and Flex Layouts for more details.

Further, let us add the following page field elements:

Group Box (Layout Only to group page field elements):


Edit Box (Input Field):

This field will represent the 'Sales Percentage' input element for our demonstration.


Group Box (Layout Only placeholder for the ojStatusMeterGauge component):

This is just a placeholder group box to generate the DIV where we will eventually add the ojStatusMeterGauge"View" data-bind attributes. Notice the 'Override PeopleTools Style?' is selected? This is to ensure that none of the delivered styles will interfere with this element.


Push Button (To Send Gauge/Input value back to PeopleSoft):

The reason why we have this push button here is to demonstrate how Oracle JET integrates with the PeopleSoft architecture (PIA). We will evaluate how certain events on the page ("View") might possibly disturb (mutate) the knockout bindings and how we can work around those issues.

Note: There may be more efficient ways (than the methods described) to workaround these quirks and I would be happy to hear from others on this topic! Please feel free to leave a comment.


Step 3: Add the ojStatusMeterGauge related data binding to the View (Page HTML)

As shown in the MOOC lesson, we will be using the div on line 252 from this Oracle JET - Cookbook - HTML code for the Status Meter Gauge. Let us adjust the attribute values slightly (to give an appropriate custom value (cskValue) for the data-bind and to update the style margin to work effectively on our Fluid page).

HTML: ojStatusMeterGauge Component DIV


Now, we need to apply the data-bind and style attributes from the above sample DIV to the gauge-container group box on our Fluid page.We can do that with the following Page Activate PeopleCode. While we are at it, we can also add the data-bind attribute to the edit box (input field). This is specifically to establish a two way data-bind between the gauge and the input field.


PeopleCode For Reference:

Declare Function SetViewport PeopleCode PTLAYOUT.FUNCLIB FieldFormula;

/* Set ViewPort Meta for SFF Scaling */
SetViewport("width=device-width,user-scalable=yes,initial-scale=1.0,minimum-scale=1.0"); /* apply the system default viewport setting */

/* Setting the data-binds in the "View" */
CSK_OJ_WRK.GROUPBOX.HtmlAttributes = "data-bind=""ojComponent: {component: 'ojStatusMeterGauge', min: 0, max: 100, value: cskValue, orientation: 'circular', plotArea: {rendered: 'on'}, metricLabel: {rendered: 'on'}, title: {text: 'Sales'}, readOnly: false}"" style=""margin: 5px auto; height:100px; width:45%;""";
CSK_OJ_WRK.PERCENT_COMPLETE.HtmlAttributes = "data-bind=""value: cskValue""";


Step 4: Apply Knockout Bindings to the ViewModel

Let us update the PageActivate PeopleCode to include a javascript object (CSK_OJ_GAUGE_MAIN_JS) on page load. This javascript will serve the same purpose as a traditional 'main.js' in the javascript/Oracle JET architecture.


JavaScript: CSK_OJ_GAUGE_INIT_JS


The reason I introduced this new javascript object (CSK_OJ_GAUGE_INIT_JS) is because if we create global variables in the CSK_OJ_GAUGE_MAIN_JS which is loaded as an AddOnLoadScript, the variables would not persist and appear as undefined subsequently. As a workaround, CSK_OJ_GAUGE_INIT_JS was created and loaded using the AddJavaScript function instead of AddOnLoadScript function - prior to the execution of our main.

JavaScript: CSK_OJ_GAUGE_MAIN_JS


- As you can see, we added the requireJS configuration path to the "ViewModel" javascript in the main (CSK_OJ_GAUGE_MAIN_JS), instead of using the global requireJS configuration in Step 1 (while setting up Oracle JET paths). This is because we do not want this app (page) specific path to clutter our global requireJS configuration.
- In the require block, we injected the Alta css to enable the oj-flex and oj-flex-item styling that we used in Step 2.
- Then, the Knockout bindings are applied to the "ViewModel" which resides in CSK_OJ_GAUGE_VIEWMODEL_JS.
- The cskOJKORefresh function was created to take care of page events that might require a server trip (e.g.: Clicking on 'Send To Server' button would trigger the FieldChange event). Since PeopleSoft automatically reloads the page field element(s) on every server trip, we will find that the Knockout data-bindings are lost when such events are triggered. For more details on this quirk, click here.

Step 5: Create ViewModel JavaScript Object - CSK_OJ_GAUGE_VIEWMODEL_JS

JavaScript: CSK_OJ_GAUGE_VIEWMODEL_JS


- The define block for the ViewModel includes all the Oracle JET libraries that are dependencies (including knockout) for ojgauge.
- The subscribe function on cskValue calls the delivered addchg_%formname function to take care of a PeopleSoft quirk once again. After a server trip, if we don't highlight/activate the edit box (input field) and simply use the gauge to modify the value, then the new value will not get propagated to the server subsequently via the component buffer (input field). This function tricks/forces the component buffer to notice the change in the input field value. For more details on this quirk, click here.

Step 6: Create the FieldChange PeopleCode Event

This code will take care of handling the 'Send To Server' push button event.


- The FieldChange event on the server side simply returns a confirmation message with the value it received for the Sales Percentage.
- Additionally, the cskOJKORefresh javascript function is invoked as part of this PeopleCode event to take care of the quirk mentioned in Step 4 (part of CSK_OJ_GAUGE_MAIN_JS).

Results:

Presto! We can see that the user can now interact with the gauge/input field in several ways:
- Directly with the input field (keyboard - numbers)
- Using the keyboard arrow keys to increment/decrement the value
- Using the mouse (or touch) to slide the gauge value


Demo of Quirks:

Why do we need cskOJKORefresh function in CSK_OJ_GAUGE_MAIN_JS?

This function is invoked every time the 'Send To Server' FieldChange event is triggered to take care of following data-binding issue after a server trip.


Why do we need to the addchg_%formname function invoked in the ViewModel?

After a server trip, if the input field is not highlighted and if we try to use the gauge to alter the value and send back to server, the change will not be propagated to the component buffer.


Reference Links:

Fluid UI - Oracle JET - Using Oracle Alta UI and Flex Layouts
Fluid UI - Oracle JET - Using KnockoutJS for Data Binding - Demo
PeopleTools 8.55+ - Using Oracle JET (JQuery, JQueryUI, requireJS and more): Part 1, Part 2, Part 3, Part 4

Fluid UI - Custom Development - Styling Tiles - Part II

$
0
0
I previously described, in this blog post, how I ran into an issue with a Fluid tile and needed a way to apply some custom style overrides on the tile image.

In the same vein, a reader asked a question on this post, if there is a way to apply similar style overrides on the tile title? We should be able to follow a similar approach to achieve something like that.

This question proves that there is definitely a case to enhance the Fluid tile configuration to allow us to apply style overrides. If you agree, then please take a moment to vote for this Idea on My Oracle Support Community.

Here are the steps to target a tile title and apply custom style overrides:

Step 1: Identify the id of the tile title

All tile title elements will have a unique id property as follows PTNUI_LAND_REC_GROUPLET_LBL$29. Here 29 is the number that uniquely identifies my tile title.


Step 2: Apply custom style override

I simply added the following custom style at the very end of my 'Fluid - Global Override Style Sheet' (CSK_BRAND_FLUID_TEMPLATE) referenced on my custom Branding Theme (CSK_THEME_FLUID). Refer: PeopleTools 8.55.x - Branding - Part I for more details. 


Note: We can adjust the margin property as per the custom requirement.

Results:


Considering Small Form Factor:

When I said the id property is unique, I was not 100% accurate. It appears that it may vary depending on the form factor we are on. It is mostly true that the id property will be unique but if we are on small form factor (SFF), then it is likely that there may be other tiles that are suppressed. This suppression of tiles on SFF causes renumbering of tile id properties. There is nothing we can do about it because it is how PeopleSoft generates the HTML for the tiles.

That said, we could identify the SFF id property for the tile and write RWD - Media Query to supplement the CSS that I previously described.

Step 3: Identify the id property for SFF

In my case, it turned out to be PTNUI_LAND_REC_GROUPLET_LBL$23.


Step 4: Add media query for SFF

Again, I simply appended to my existing CSS that I used in step 2.


Results:


PeopleTools - Using Google Analytics (analytics.js)

$
0
0
In one of my branding posts, I described how we could inject the Google Analytics javascript (ga.js) code snippet using the Branding Framework.

As most of you know, the latest version of Google Analytics library is analytics.js.
https://developers.google.com/analytics/devguides/collection/upgrade/reference/gajs-analyticsjs

To start using analytics.js, all we have to do is update our custom Google Analytics injection code.

Here are the steps to migrate/implement analytics.js.

Development Environment: HCM 9.2 PUM Image 17 - PeopleTools 8.55.03

Create a custom javascript object with analytics.js code snippet:

Make sure you substitute your property id on line 6.


Inject custom javascript object to the application globally:

In my case, I am using a custom Global JS Injection Framework that I described previously (refer: post 1 and post 2). You are free to use other options that might work best for you.

At a high level, PT_UTIL ---includes--- CSK_FL_BOOTSTRAP_JS ---includes--- CSK_INJECT_JS. CSK_INJECT_JS is where we can list all the javascript objects that we want to load (globally or targeting specific conditions).

Here are jsfiddle links to the versions of CSK_FL_BOOTSTRAP_JS and CSK_INJECT_JS at the time of writing.

Results:


Event Mapping Framework - Hello World and Quirks

$
0
0
Ever since PeopleTools 8.55 was released last year, I have heard fantastic things about the new Event Mapping Framework. I also saw great demos while attending various sessions at Oracle OpenWorld 2016. Although, I know the concept of Event Mapping Framework in theory, I never got a chance to use this functionality. So, I decided to create a simple 'Hello World' example to understand the mechanics.

Step 1: Create a custom App Package

This is the event that we will be mapping to a Component PeopleCode. There is nothing fancy in the event, just a basic 'Hello World' message using MessageBox function.


Step 2: Create a Related Content Service

Navigator > PeopleTools > Portal > Related Content Service > Define Related Content Service


Step 3: Map Related Content Service to Component Event

Navigator > PeopleTools > Portal > Related Content Service > Manage Related Content Service > Event Mapping (Tab) > 'Map the event of the Application pages' hyperlink

Let us add this event to the USERMAINT - 'User Profiles' Component. For this example, let us map our related content service as the 'Post Process' event on the Component PostBuild PeopleCode. This is the same example component which Jim Marion used during his Tips and Techniques session at Oracle OpenWorld this year. I doubt the link will work for long, so grab Jim's slide deck as soon as you can!


Results:

Here we can see that our custom event gets executed as per the Event Mapping Framework configuration. Great!


Quirk:

Now, if we use our custom event and try to execute it as part of another component, say URL_TABLE (PeopleTools > Utilities > Administration > URLs), we will find that it will not get executed. Isn't it a little baffling? Because, even if we perform exactly the same steps as described above, somehow it would appear that something is missing!


After some trial and error, I figured that any custom events mapped to a Component (or Component Record) PeopleCode event via 'Event Mapping Framework' will get executed only if there is some code already associated with the actual Component (or Component Record) PeopleCode.

E.g.: URL_TABLE.GBL.PostBuild (Component PeopleCode) does not contain any code. So, any events mapped to this PeopleCode will not be executed.


Is this working as designed? I really hope not! I hope that it is a bug (or unintended feature) that will be fixed/enhanced in the future releases. Otherwise, it may not be as easy to use the Event Mapping Framework as we expect it to be. Particularly, if we are looking at this framework as an option to reduce customizations.

Demo of the quirk:


Other resources on Event Mapping Framework:
Chris Malek's Blog
psadmin.io Blog
Jim Marion - Tips and Techniques - OOW16 (may only be available for a limited time)
PeopleSoft Mods by Colton Fisher
PeopleBooks - Mapping Application Class PeopleCode to Component Events

Piwik: Open-Source Web Analytics Platform

$
0
0
While presenting at Oracle OpenWorld 2016, I demonstrated the integration of Google Analytics (GA) with PeopleSoft Applications for generating usage metrics. One of the big reasons that many find GA an attractive option aside from its superior features, is the fact that it is free. Of course, there are some limits to the term 'free'. After my presentation, I had an informative conversation with Greg Kelly from Oracle, who pointed out that just because a product is free, it does not necessarily mean it is the right solution for everyone. Greg also mentioned Piwik (hat tip), which is one of the most popular open-source web analytics platform and has an unique selling proposition of 100% data ownership.

In my personal opinion, Google Analytics is far more superior when it comes to functionality and features but I am aware that not everyone would be able to leverage Google Analytics due to various reasons (primarily data ownership). That said, Piwik is a great alternative for such customers to create a locally or cloud hosted web analytics platform which provides full control of their data. I am stating the obvious but Piwik does come with the cost of setting up and maintaining the infrastructure to host it somewhere.

Here are some resources that I found interesting and relevant to this topic (there may be many more out there):
https://zenincognito.com/piwik-vs-google-analytics-a-detailed-review/
https://piwik.pro/2016/05/infographic-piwik-vs-google-analytics/
http://www.kaushik.net/avinash/how-to-choose-a-web-analytics-tool-a-radical-alternative/

Here is my recent blog on how to integrate Google Analytics with PeopleSoft Applications:
https://pe0ples0ft.blogspot.com/2016/09/peopletools-using-ga-analytics-js.html

Here are the steps that I followed to setup and integrate Piwik with a PeopleSoft instance (HCM 9.2 PUM 17 - PeopleTools 8.55.06).

Step 1: Download and install Piwik

Resource: http://piwik.org/docs/installation/

In my cases, I downloaded Piwik from the Microsoft Windows Web App Gallery.
http://piwik.org/blog/2013/02/piwik-microsoft-windows-web-app-gallery/

Then, I followed the installation wizard to install Piwik on my Windows 7 desktop computer where my PUM image is also running.

Some gotchas for Windows installation based on my experience.

Windows Firewall Inbound Rules:

I had to punch a hole in the Windows Firewall and set up an inbound rule to allow requests on a port of choice.

Windows Firewall > Advanced Settings > Inbound Rules


IISExpress - Site Binding Configuration (applicationhost.cfg):

I also had to add site bindings to the IISExpress applicationhost.cfg to handle URL binding failures.
https://www.iis.net/learn/extensions/using-iis-express/handling-url-binding-failures-in-iis-express


Add trusted hosts to Piwik config.ini.php:

Finally, I had to add my localhost ip+port combination to the config.ini.php file as a trusted host.

WebMatrix > Piwik > config > environment > config.ini.php > trusted_hosts


Step 2: Login to the Piwik Admin Console and add a new site

Reference: http://piwik.org/docs/manage-websites/

Step 3: Obtain Piwik Tracking Code JavaScript snippet

Piwik > Administration > Websites > Manage Websites > View Tracking Code

You will find code similar to the following screenshot:


Next, I created a Branding Object in PeopleTools with the preceding javascript:

Navigation: PeopleTools > Portal > Branding > Branding Objects


Note: I only used the code snippet inside the script tag and also commented out the noscript portion for this proof of concept.

Step 4: Inject custom javascript in PeopleSoft

This part is similar to the Google Analytics javascript injection. To inject this custom javascript object across the PeopleSoft application, I used a custom framework for Global JS Injection. Details are in the following link:
Global JavasScript Injection Framework


Note: You don't have to use the same Global JS Injection Framework. You could use any other technique that might work best for your environment. The idea is to make sure the javascript is executed on every single page across the PeopleSoft application to send the usage metrics to the Piwik server.

Results:

Here is a screenshot of the Piwik Dashboard.


Event Mapping Framework - Migration

$
0
0
A reader asked a question in one my posts on Event Mapping Framework.

Question: Do you know how I can include the "Configure Event Mapping" settings in an App Designer project so I can migrate it from dev to test to prod environments?

The answer is very simple. Since the Event Mapping Framework is simply an extension of the 'Related Content Service' functionality, the procedure to migrate the configuration is also the same as migrating 'Related Content'.

For those who are new to Related Content and/or Event Mapping Framework, here are the steps that will help with the migration.

Step 1: Insert 'Related Content Definition' into the Project


This will take care of migrating the 'Related Content Definition' and associated Application Class. Note: We must highlight 'Application Packages' under the 'Related Definitions' before inserting the Related Content Service ID into the project.


Step 2: Insert 'Related Content Service' into the Project


Insert the 'Related Content Service' by entering the 'Portal Object Name' of the associated 'Content Reference'. This will take care of migrating the 'Event Mapping' Configuration.


Step 3: Save and Migrate the Project

Simply save and migrate the project from the source to the target environment.

DIY - PeopleSoft on the Cloud - Part 1

$
0
0
There has been tremendous improvements in PeopleTools 8.55 - which we have seen over the past year - specifically involving changes that make deploying PeopleSoft on the Cloud a very real, intuitive and easy prospect.

Of course, deploying PeopleSoft on a hosted environment is not new and has been done in the past. But 8.55 makes it so much more easier.

Most of us who work in the PeopleSoft space are already getting used to the various messaging from Oracle around Cloud and what it means to those using PeopleSoft applications. There are several great presentations (at conferences), webinars and documentation relevant to this subject which I guess is one of the hottest topics right now.

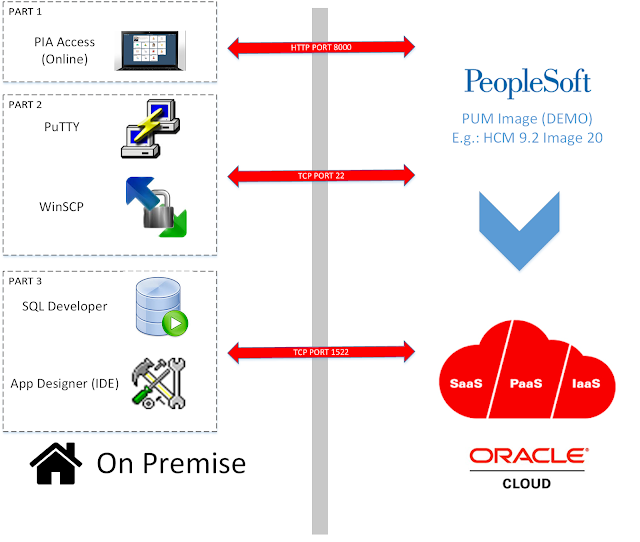
In this series of blog posts, I plan to take a very basic use case of deploying a PeopleSoft Update Image (DEMO) on the Oracle Compute Cloud and document the steps that I followed. I also intend to go beyond the immediate necessity of getting the environment up and running; and accessing the PIA for evaluating the latest features, enhancements and bug fixes. Additionally, this blog series will also cover how we can connect to the PUM Image - running on the Oracle Compute Cloud - using PuTTY, winSCP, SQL Developer, App Designer, etc. from an on-premise workstation to perform PeopleSoft administration and development related activities.


Note: At the time of writing, I am using a FREE TRIAL (30 day) access which is available for most Oracle Cloud services.

Part 1 (current post): Will cover what it takes to sign up (for the initial 30 day free trial), get started, up and running with a PeopleSoft Update Image (available on the Oracle Cloud Marketplace) deployed on the Oracle Compute Cloud.

Part 2: This post will cover how we can access the PUM Image deployed on the Oracle Compute Cloud (via SSH) using PuTTY and winSCP from an on-premise workstation to perform PSADMIN activities like administering and configuring the servers at various tiers.

Part 3: This post will cover how we can access the PUM Image deployed on the Oracle Compute Cloud using SQL Developer and App Designer from an on-premise workstation to perform PeopleSoft development related activities/research.

Before I proceed with Part 1, I would like to share a few resources that I highly recommend for those who are new to the concept of "PeopleSoft on the Cloud".

Resources:

Quest Webinar: PeopleSoft on the Cloud - so, how do you use it?
Information Portal: PeopleSoft on Oracle Cloud
Oracle Red Paper: Getting Started with PeopleSoft Environments on the Oracle Compute Cloud Service
PeopleSoft Apps Strategy Blog: PeopleSoft on Oracle Cloud

I would also like to make a special mention to Logesh Balasubramaniam - from Presence of IT and author of "Lean IT Designs" blog - who was very helpful in sharing his knowledge and experiences on this topic.

The rest of this post will be heavily based on the following tutorial with some of my tips and experiences:
Deploying PeopleSoft Applications on Oracle Compute Cloud Service Instances

Step 1: Request a free trial access to the Oracle Compute Cloud

If you are - like me - new to hands on activity on the Oracle Cloud, you may perhaps be reminded of the following quote from The Rime of the Ancient Mariner by Samuel Taylor Coleridge.

"Water, water, every where,
Nor any drop to drink."

To me, it was not very obvious which of the myriad Oracle Cloud Services I should be subscribing to and activating to deploy a PeopleSoft PUM Image from the Oracle Cloud Marketplace.

After working with the "Live Cloud Chat" team, I figured I needed the "Oracle Cloud PaaS and IaaS" Service.

To get started, navigate to https://cloud.oracle.com/tryit and click on the "Try It" link under "Platform and Infrastructure".


At this point, you will be prompted to signin with your Oracle account. Based on my personal experience and what I heard from the support team, the chances of getting the trial request processed in a timely fashion are much higher if you are using your enterprise id instead of a personal id.

Here is an excerpt from my conversation with the "Live Cloud Chat" team:
"Please note trials coming from personal email addresses (Yahoo/Gmail/Hotmail etc.) are not being processed at the moment, if you want to request for a trial of our cloud services please register using an official email ID (enterprise email: @yourcompany.com)"

Step 2: Wait until you receive an email from Oracle!

If you used an enterprise email address, you should get an email from Oracle (within an hour) which contains the access and subscription details.


Now we are ready to proceed further.

Step 3: Follow steps 1 through to 6 in tutorial

Now we are ready to go through the following steps in the tutorial:
Deploying PeopleSoft Applications on Oracle Compute Cloud Service Instances
  1. Generate an SSH key pair using an on-premises Linux or Microsoft Windows system.
  2. Upload the SSH public key to Oracle Compute Cloud Service.
  • Configure the Oracle Compute Cloud Service instance for HTTP access.
  • Determine the PeopleSoft application to be deployed and initiate deployment in Oracle Cloud Marketplace.
  • Use the Oracle Compute Cloud Service web console to configure the instance that will be used to host the PeopleSoft application.
  • Sign in to the PeopleSoft application.
  • Note: Please review Part 2 before proceeding with further steps in the tutorial (related to using SSH) because there are some security steps that are missing.

    Once we complete the above mentioned steps (1-6) from the tutorial, we can login to the PIA of the PUM image running on the Oracle Compute Cloud. Since we opened the http port 8000 (or https depending on your choice), we can access the environment from anywhere via the internet!

    Tip 1: Uploading the SSH public key

    How do we determine our Cloud Data Center while signing into Oracle Cloud My Services application?


    One way is to login to the "My Account Administration" received in the email (Step 2).

    From Email:


    Note the Oracle Compute Cloud Service Details from the Dashboard.


    Tip 2: Configuring the instance

    The screens for configuring the instance have changed in comparison to the tutorial but here are the main items to consider.

    Image Settings:


    Shape Settings:


    Instance Settings:


    Make sure you add the SSH Public Key (created in Step 1 of the tutorial):


    Storage Settings:


    Tip 3: Waiting for the instance to be "Running" after initiating the creation

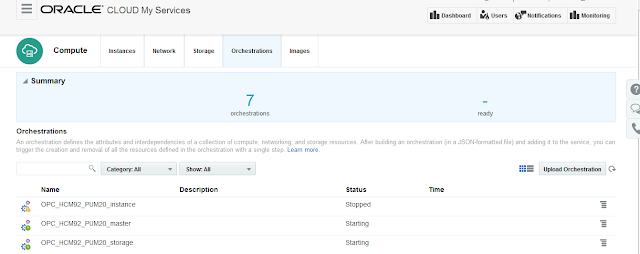
    After configuring, reviewing and creating the instance, I was not able to see the created instance (in "Preparing" status) in the Instance tab right away. Instead, I could only find 3 orchestrations with statuses as shown in the image below. This is normal!


    I would encourage you to remain patient and wait for at least a couple of hours for the instance to show up in the Instance tab with a "Running" status as shown below before proceeding with subsequent steps.


    Related Links:

    DIY - PeopleSoft on the Cloud - Part 2
    DIY - PeopleSoft on the Cloud - Part 3

    DIY - PeopleSoft on the Cloud - Part 2

    $
    0
    0
    Now that we have the PeopleSoft PUM Image (DEMO environment) up and running on the Oracle Compute Cloud, we can move on and dive deeper into more interesting topics! This post will detail how we can set up SSH access and connect to the PUM Image via PuTTY and WinSCP to perform PSADMIN activities such as configuring, bouncing and clearing cache on the app/web/process scheduler servers.

    Step 1: Create Security List for SSH access and add to the instance

    Create Security List:

    Oracle Compute Cloud Service console > Network tab > Security Lists > Create Security List


    Create Security Rule:

    Oracle Compute Cloud Service console > Network tab > Security Rules > Create Security Rules


    Add Security List to Instance:

    Oracle Compute Cloud Service console > Instances tab > Instances > View > Under "Security Lists"> Add to Security List

    In my example, the security list that I added is called 'allow_admin_clients'.


    Step 2: Configuring PuTTY and logging in to the instance using SSH

    After creating the Security List and adding the instance it (step 1), we are now ready to proceed with the steps detailed in the tutorial:
    - Logging in to your instance using SSH

    The steps detailed in this section of the tutorial are straight forward. I was able to use the "Logging in from a Windows System" instructions and connect to my PUM image (running on OPC - Oracle Public Cloud) via SSH using PuTTY running on my on premise workstation.


    Note: The first time we successfully login via PuTTY as opc user, we will be prompted to change the default password (OracleCloud). Make sure that you change and notate the new password!

    Refer: Changing the default password for opc user

    Step 3: Configuring WinSCP and logging in to the instance using SCP

    Before I proceed with demonstrating how to access PSADMIN using PuTTY, I want to detail how to similarly configure WinSCP to connect to the instance running on OPC. I use WinSCP heavily for various activities such as navigating to and deleting web server cache folder, viewing db/app/web server log files, loading custom javascript libraries to the web server, loading custom jar files to the app/web servers and so on.

    Open WinSCP > New Site
    - File protocol: SCP
    - Host name: Enter the public IP of your instance
    - Port number: 22
    - User name: opc
     Advanced Site Settings > SSH > Authentication:
    - Private key file: Point to the location where you stored your SSH private key (.ppk)


    Save the configuration and login. You will be prompted to enter your SSH Key passphrase.


    Step 4: Accessing PSADMIN via PuTTY

    We already saw in step 2, how we could connect to the instance via PuTTY. This involves using the opc user provided to us as part of the tutorial instructions.


    In order to access, PSADMIN it is best if we use psadm2 (one of the default users created in PUM images). Here are the commands that allow us to switch from opc user to psadm2 user and invoke PSADMIN.

    Command: sudo -s
    Description: Switch to root

    Command: su psadm2
    Description: Switch to psadm2

    Command: cd $PS_HOME/appserv
    Description: Change directory to appserv folder under $PS_HOME

    Command: ./psadmin
    Description: Invoke PSADMIN


    Once we are in PSADMIN as psadm2 user, the steps to bounce and purge cache on the app/web/process scheduler servers are the same as detailed in one of my older posts.
    Refer: PeopleSoft PUM Image - Virtual Machine - How to access PSADMIN

    We are now able to access PSADMIN of our demo instance (PUM image running on OPC) via PuTTY (SSH) from an on premise workstation!

    DIY - PeopleSoft on the Cloud - Part 3

    $
    0
    0
    In this third and final part, I will demonstrate how to access the demo instance (PUM image on OPC) via SQL Developer and App Designer from an on premise workstation.

    Step 1: Create Security List for database access and add to the instance

    Create Security IP List:

    Oracle Compute Cloud Service console > Network tab > Security IP Lists > Create Security IP List

    Enter the public ip address(es) of your on premise workstation(s). This will ensure that only a trusted list of on premise ip addresses can access the database (via SQL Developer/App Designer) of your demo instance (PUM image running on OPC).

    Note: If you are not sure of the public ip address of your on premise workstation then simply visit https://whatismyipaddress.com/ using a browser on the workstation.


    Create Security Application:

    Oracle Compute Cloud Service console > Network tab > Security Applications > Create Security Application

    Create a Security Application to open TCP port 1522 to allow database access. You might wonder how I figured the database for the demo instance is using port 1522? We can find it in the tnsnames.ora file located in /opt/oracle/psft/pt/tools_client/ which we can access via WinSCP (refer: Part 2).


    Create Security List:

    Oracle Compute Cloud Service console > Network tab > Security Lists > Create Security List


    Create Security Rule:

    Oracle Compute Cloud Service console > Network tab > Security Rules > Create Security Rule

    Using the Security IP List, Security Application and Security List that we just created, create a Security Rule as follows:


    Add Security List to Instance:

    Oracle Compute Cloud Service console > Instances tab > View > Under "Security Lists"> Add to Security List

    In my example, the security list that I added is called 'psftuser_sec_list_1522'.


    Step 2: Installing Oracle and PeopleTools Clients (SQL Developer and App Designer)

    Hypothetically, if we had installed the PUM image locally and if we did not already have the Oracle and PeopleTools clients installed on the local workstation, then we would have mapped the samba drive and installed the clients from there.

    I was not able to figure out how to map the samba drive of the demo instance (PUM image) running on OPC to an on premise workstation. The alternative/workaround is to connect to the instance on OPC using WinSCP from the on premise workstation (as described in Part 2), download the relevant folders locally and install the necessary clients.

    We can find the content of the samba drive under the following location using WinSCP:
     /opt/oracle/psft/pt/tools_client


    Step 3: Updating the tnsnames.ora file on the on premise work station

    Find the database name of the instance:

    Login to the instance online and navigate to the following page:
    Navigator > PeopleTools > Lifecycle Tools > Update Manager > Update Manager Dashboard > Update Manager Utilities > About PeopleSoft Image


    Add database to the tnsnames.ora file on the on premise workstation:

    For a typical Oracle client installation, the tnsnames.ora file can be found in the following directory:
    C:\oracle\product\12.1.0\client_1\network\admin


    TNS Details:

    HOST: Enter the public ip address of your instance
    PORT: 1522
    SERVICE_NAME: Enter the database name of your instance which we determine in the preceding steps

    <ENTER_DBNAME> =
       (DESCRIPTION =
           (ADDRESS_LIST =
               (ADDRESS = (PROTOCOL = TCP)(HOST = <ENTER_PUBLIC_IP>)(PORT = 1522))
           )
           (CONNECT_DATA =
               (SERVER = DEDICATED)
               (SERVICE_NAME = <ENTER_DBNAME>)
           )
        )

    For Example:


    Step 4: Access OPC instance via SQL Developer from on premise workstation

    Default Username/Password: SYSADM/SYSADM

    Connection Properties:


    Successful Connection:


    Step 5:Access OPC instance via App Designer from an on premise workstation

    Note: The default connect id and password is the same as people/peop1e

    If you have not configured the default connect id/password then you can do so using Configuration Manager.

    The PeopleTools client installation should be in your C drive.
    For example: C:\PT8.55.11_Client_ORA\

    We can find Configuration Manager (pscfg.exe) and App Designer (pside.exe) in the following location:
    C:\PT8.55.11_Client_ORA\bin\client\winx86\

    Connect via App Designer:

    Use the database name of your OPC instance which we determined in the preceding steps.


    Successful Connection:


    Using PSSpreadsheet Class in App Engine

    $
    0
    0
    Jim Marion brought the PSSpreadsheet class to our notice during Oracle OpenWorld conference last year. If you want a copy of his slide deck, you can find it in the below link (may not work for long, so grab it before they take it down):
    https://oracle.rainfocus.com/scripts/catalog/oow16.jsp?search=marion&search.event=oracleopenworld

    There is a great delivered example under the following navigation:
    Reporting Tools > PS/nVision > Spread Sheet API Sample Page

    This page provides a working example of how to use the PSSpreadsheet class to render a spreadsheet to the end user via an IScript (WEBLIB_SSAPI.ISCRIPT1.FieldFormula).

    Peoplebooks:
    Understanding The PSSpreadsheet Class

    Someone asked if we could use the same PeopleCode API to create spreadsheets using an App Engine and post the file to the Report Manager? Here is an example of how we can do just that.

    Sample App Engine PeopleCode:


    Results:

    The file should show up in Process Monitor as follows:


    Notes:
    - Currently, if we use the Open method of the PSSpreadsheet class to create the spreadsheet, it creates the file in the PS_HOME directory by default. There appears to be no way to pass in a parameter such as %FilePath_Relative to create the file in the process instance directory which would in turn help with posting the file to the Report Manager (Perhaps a good enhancement?). To workaround that, I wrote some code to dynamically derive the process instance directory and pass that as the first parameter (filename) for the Open method.
    - The second parameter for the Open method is a boolean. We can enable Rowset processing by setting it to True. This does not seem to be documented in PeopleBooks but we can figure it out based on code in the IScript example (WEBLIB_SSAPI.ISCRIPT1.FieldFormula).

    Sample Project in GitHub:
    https://github.com/SasankVemana/PSSpreadsheet-in-App-Engine

    Consider voting for idea to enhance PSSpreadsheet class Open method:
    https://community.oracle.com/ideas/16749

    PeopleCode for Reference:

    /* Get Process Instance Directory */
    SQLExec("SELECT PRCSOUTPUTDIR FROM PS_CDM_LIST WHERE PRCSINSTANCE = :1", SV_AE_TEST_AET.PROCESS_INSTANCE, &path);

    /* Get Directory Separator */
    &dirSep = "/";
    If Substring(GetEnv("PS_SERVDIR"), 1, 1) <> "/" Then
       &dirSep = "\";
    End-If;;

    /* Set Output File Name */
    &outFileName = "HelloWorld.xlsx";

    /* Create Spreadsheet using PSSpreadsheet class */
    Local object &ss;
    &ss = CreateObject("PSSpreadsheet");
    &ss.Open(&path | &dirSep | &outFileName, True);

    /* Load data using Rowset */
    Local Rowset &rs = CreateRowset(Record.PSMSGCATDEFN);
    &rs.Fill("where MESSAGE_SET_NBR = :1", 4);
    &ss.SetRowSetData(&rs);

    /* Save */
    &ss.save();

    Fluid UI - New Window Feature - Workaround

    $
    0
    0
    Graham Smith created an idea on My Oracle Support Community to carry forward the "New Window" feature in Fluid pages especially for users on the desktop (or non-small form factor devices).

    We can understand that Fluid user interface is designed with a mobile first and more importantly small form factor (SFF) first approach. This is one of the reasons why we don't get the Toolbar Actions (Save, Return to List, Next in list, Previous in list, etc.) by default on Fluid pages. But Graham has rightly pointed out that Fluid is not just an UI for mobile devices, we also need to account for users on desktops who are accustomed to opening new windows using the "New Window" feature.

    This idea is trending and has already received several votes in a short period. I am hoping this would be incorporated as an enhancement in the future PeopleTools releases. I encourage everyone to continue voting. The more the merrier!
    https://community.oracle.com/ideas/16701
     
    Workaround while we wait?

    Note: The workaround suggested in this post involves a minor customization. As with any customization, we will need to determine - based on our environment and circumstances - if the cost of maintaining this customization (until such time as we receive a solution from Oracle) outweighs the benefits!

    Let us say that we decided to go down the path of introducing the "New Window" feature in Fluid, where would we put it? I am not convinced that bringing it back in literal terms and placing it exactly where it was located in Classic pages would be a good fit for Fluid (even if we are only talking medium, large and extra large form factors). If we notice, the traditional "Help" feature that links to context sensitive PeopleBooks, is now located in the Action Menu on the Fluid Header.

    New Window and Help links in Classic:


    Help link in Fluid:


    It seems logical to similarly add the "New Window" functionality to the Action Menu in the Fluid Branding Header! That way, we will not be interfering with the content area of the page.

    In my previous posts on Branding, I described how we can globally (across the application) add a link to the Action Menu in the Fluid Branding Header. I demonstrated the concept using an external link as an example.
    Refer: Adding Custom Links to Fluid Branding

    We can follow the same steps to add the 'New Window' link as well. In my case, I already created the custom subpage (CSK_HEADER_ACTION). I simply added a groupbox and a hyperlink (derived work field) to the subpage (similar to the external link example).


    I added the following PeopleCode on the FieldChange event to open a New Window.


    Results:


    Suppress New Window feature on Small Form Factor (SFF) Devices (Optional):

    If we would like to suppress the New Window feature for SFF devices, then we can simply configure this using the page field properties as shown in the following screenshots.


    PeopleCode for Reference:

    &fullURI = %Request.FullURI;

    &pos1 = Find("/psc/", &fullURI);
    &part1 = Substring(&fullURI, 1, &pos1 + 4);
    &part2 = Substring(&fullURI, &pos1 + 5, Len(&fullURI));

    &pos2 = Find("/", &part2);
    &part3 = Substring(&part2, 1, &pos2 - 1);
    &part4 = Substring(&part2, &pos2, Len(&part2));

    &pos3 = Find("_", &part3);
    If &pos3 = 0 Then
       &site = &part3;
    Else
       &site = Substring(&part3, 1, &pos3 - 1);
    End-If;

    &newWinURL = &part1 | &site | "_newwin" | &part4;
    ViewContentURL(&newWinURL);


    Related Posts - Productivity Enhancements:
    Fluid UI - CTRL+J - On Mobile Devices

    Related Content/Event Mapping for Components not registered in the Portal

    $
    0
    0
    Related Content Framework and the latest Event Mapping Framework allow us to add services to components (and other content reference types) that are registered in the Portal Menu Structure - Structure and Content. What if we want to add related content or event mapping services to a component that is not registered in the Portal?

    Question Courtesy: Lewis Thompson
    Event Mapping Framework - Hello World and Quirks | Comment


    E.g.:

    Component 1
    - Hyperlink > Transfers to Component 2
    - Hyperlink > Transfers to Component 3


    We can see in the above scenario, only Component 1 is registered in the Portal. From Component 1, we use FieldChange peoplecode events to transfer to Component 2 and Component 3.

    Component 1:


    Transfer to Component 2 - FieldChange PeopleCode:


    Transfer to Component 3 - FieldChange PeopleCode:


    What if we want to add a related content or event mapping service to such components (Component 2 or Component 3) that are not part of the Portal menu structure?

    David Bain from Oracle recently presented an overview of PeopleTools 8.56 (which is not GA yet) via Quest (access recording here). @24:23 he talks about expanding support for Event Mapping Framework via a related content API. It is possible that an API to related content would be very handy for such scenarios! But we will have to wait and see!

    In the interim, here are the steps to workaround the scenario detailed above.

    Adding Related Content Service:

    Register the Component to a Hidden Folder in the Portal | Structure and Content:

    PeopleTools > Portal > Structure and Content


    Assign Related Content to hidden Content Reference:

    PeopleTools > Portal > Related Content Service > Define Related Content Service


    PeopleTools > Portal > Related Content Service > Manage Related Content Service > Content References (Tab) > Assign Related Content to an Application Page (Link) > Include hidden Crefs (Option)


    Adding Event Mapping Service:

    Register the Component to a Hidden Folder in the Portal | Structure and Content:

    PeopleTools > Portal > Structure and Content


    Assign Event Mapping Service to hidden Content Reference:

    PeopleTools > Portal > Related Content Service > Define Related Content Service


    Application Class Implementation:


    PeopleTools > Portal > Related Content Service > Manage Related Content Service > Event Mapping (Tab) > Map the event of the Application pages (Link) > Include hidden Crefs (Option)


    Results:


    Using Different Branding Themes for Different Portals

    $
    0
    0
    Most of the posts on my blog are mainly based on or inspired by questions/comments/ideas on my blog, OTN, HEUG and other PeopleSoft forums. This post is no different. Someone raised an interesting query on one of my Branding posts:
    What would it take to have a different logo for the different portals (Employee, Supplier, ...)?

    We already know how to use 'Branding Themes' to configure Branding requirements like logo, icon, color changes, etc.
    PeopleTools 8.54 - Branding - Part 1
    PeopleTools 8.55 - Branding - What's new?

    For the purposes of this demonstration I created two very simple but different Branding Themes (SV_RED_THEME_FLUID and SV_BLUE_THEME_FLUID). And as we can see below, I am using SV_RED_THEME_FLUID in my 'Branding System Options' as the 'Default Branding Theme'.

    SV_RED_THEME_FLUID:


     SV_BLUE_THEME_FLUID:


    Branding System Options:


    But the changes that are part of a Branding Theme which are applied using the 'Branding System Options' would propagate across the application to all portals (EMPLOYEE, SUPPLIER, CUSTOMER, etc.).

    How do we override the 'Default Branding Theme' for specific portals?

    Let us say, we want to use a different theme (SV_BLUE_THEME_FLUID) for our CUSTOMER portal.

    The solution is very simple. We just need to use the 'Assign Themes' page to configure the override. But the caveat is that we must log in to the portal in question (CUSTOMER in this case) while performing the 'Assign Themes' step.

    PeopleBooks: Assign Branding Themes


    Trick/Shortcut to switch between portals:

    Simply edit the URL to replace the portal portion with the desired value (assuming we have security access to the portal concerned).
    E.g.:
    http://pi004.cs92.com:8000/psp/ps/EMPLOYEE/SA/c/PTBR_MENU.PTBR_ASSIGN_THEME.GBL
    http://pi004.cs92.com:8000/psp/ps/CUSTOMER/SA/c/PTBR_MENU.PTBR_ASSIGN_THEME.GBL


    Assign Theme Override for a specific Portal (CUSTOMER):


    Results:

    Sign out, clear browser cache and sign back in to see the results.


    Environment Details:
    CS 9.2 - PUM Image 4 - PeopleTools 8.55.12

    Related Post:
    Role Based Branding Theme Assignments

    Fluid UI - Tile Wizard API for Dynamic Tile Content

    $
    0
    0
    PeopleTools 8.55 introduced the Tile Wizard App Classes which enable us to use the API to dynamically modify Tile Content.

    PeopleBooks: Tile Wizard Classes

    There are three main areas in the Tile where we can add dynamic content - Tile Content, Live Data and Badge.

    Here is an example of how we can use the Tile Wizard Classes to dynamically update the content of a Tile as shown in the example below.


    Step 1: Implement a custom App Class that extends PTGP_APPCLASS_TILE:Tiles:Tile


    Notes:
    - Make sure the App Package contains a Sub Package. Otherwise, we might run into errors as stated in this HEUG Technical Forum discussion.
    - We can use the %This.SetTileContentAs... methods - %This.SetTileContentAsTwoKPIs() in this case - to override the "Tile Content Type" configured using the Tile Wizard (which we will perform in step 2).
    - We can also use the various Tile Class Properties to set the Tile Content (e.g.: KPI values and labels), Live Data (values, trend image and metrics formatting) and Badge Data.

    Step 2: Create Tile using Tile Wizard

    NavBar > PeopleTools > Portal > Tile Wizard > Create Tile


    Notes:
    - We can see that the App Class created in step 1 is referenced as the Data Source.
    - Also, the "Tile Content Type" is set to Image in the Wizard configuration level (although it will be overwritten using PeopleCode).
    - Similarly, the "Tile Badge" is set to "No" in the Wizard configuration but it can be overwritten using PeopleCode.


    Note:
    - For the purposes of this example, I set the Target Page to "PS Unit". This can be set to anything as per our requirement.


    Note:
    - The Tile image is set to PTFP_DEFAULT_CLOUD as a dummy. It will not be used in this case, because we will be overriding the "Tile Content Type" via PeopleCode.


    Step 3: Add Tile to a Fluid Homepage

    Fluid Home > Action Menu > Personalize Homepage


    Results:


    Environment Details:

    - CS 9.2
    - PUM Image 4
    - PeopleTools 8.55.12

    Related Posts:
    Part 2
    Part 3

    PeopleCode for Reference:

    import PTGP_APPCLASS_TILE:Tiles:Tile;

    class TILE_1 extends PTGP_APPCLASS_TILE:Tiles:Tile
       method TILE_1();
       method getTileLiveData();
    end-class;

    method TILE_1
       %Super = create PTGP_APPCLASS_TILE:Tiles:Tile();
    end-method;

    method getTileLiveData
       /+ Extends/implements PTGP_APPCLASS_TILE:Tiles:Tile.getTileLiveData +/
      
       %This.SetTileContentAsTwoKPIs();
       /* 1 KPI tile content */
       %This.TileKPI_1 = %This.getAmountFormattedValue(1.23456789, "USD");
       %This.TileKPI_1_Label = "KPI1_1 Label";
       %This.TileKPI_2 = "KPI_2";
       %This.TileKPI_2_Label = "KPI_2 Label";
      
       /* Live Data */
       %This.TileLiveData_1 = "LD_1";
       %This.TileLiveData_2 = "LD_2";
       %This.TileLiveData_3 = "LD_3";
      
       /* A trend arrow is an optional element of live data. */
       %This.hasLivedataTrendImage = True;
       %This.TrendImage = %This.k_strTrendDownImage;
      
       /* Metrics Formatting */
       %This.isTileLiveData_1_Metrics = True;
       rem %This.isTileLiveData_2_Metrics = True;
       rem %This.isTileLiveData_3_Metrics = True;
      
       /* Badge */
       %This.hasLiveDataCount = True;
       %This.TileTransCount = 7;
      
    end-method;

    Fluid UI - Tile Wizard API - Part 2 - Dynamic Tile Images

    $
    0
    0
    This post is a continuation of my previous article on the Tile Wizard API, where I described how we can use the Tile Wizard API to dynamically update the Tile Content.

    In this post, we will see how we can use the Tile Wizard API for another similar and more common use case to display a dynamic image based on certain conditions.

    For the purposes of this post, let us assume that we want to create a Tile called 'My Team' that displays a different image and live data based on the user's security role assignment.

    Demo:


    Tile Wizard Setup:

    NavBar > PeopleTools > Portal > Tile Wizard > Create Tile


    App Package PeopleCode Implementation:


    PeopleCode for Reference:

    import PTGP_APPCLASS_TILE:Tiles:Tile;

    class TILE_2 extends PTGP_APPCLASS_TILE:Tiles:Tile
       method TILE_2();
       method getTileLiveData();
    end-class;

    method TILE_2
       %Super = create PTGP_APPCLASS_TILE:Tiles:Tile();
    end-method;

    method getTileLiveData
       /+ Extends/implements PTGP_APPCLASS_TILE:Tiles:Tile.getTileLiveData +/
      
       If IsUserInRole("SV_CSK") Then
          rem %This.setTileImageRef("SV_CSK"); /* Method equivalent */
          %This.ImageReferenceField.Value = Image.SV_CSK;
          /* Live Data */
          %This.TileLiveData_1 = "Chennai Super Kings";
       End-If;
      
       If IsUserInRole("SV_RCB") Then
          rem %This.setTileImageRef("SV_RCB"); /* Method equivalent */
          %This.ImageReferenceField.Value = Image.SV_RCB;
          /* Live Data */
          %This.TileLiveData_1 = "Royal Challengers Bangalore";
       End-If;
      
    end-method;

    Fluid UI - Tile Wizard API - Part 3 - Dynamic Tile Style

    $
    0
    0
    This is a continuation of the Fluid UI - Tile Wizard API series: Part 1 and Part 2. In this part, we will explore the Tile Wizard API further to dynamically style tiles and more importantly find an option to target specific tiles to apply custom style classes.

    In the past (refer Fluid UI - Styling Tiles - Part 1 and Part 2), I wrote about the challenges with the way the id attribute is auto-generated in the tile html (div elements).

    E.g.: In the screenshot below, the div element for the 'Financial Account' Tile in the Student Homepage has an id attribute value of win0divPTNUI_LAND_REC_GROUPLET$2.


    The number 2 in the id attribute value denotes that it is the third (starting with 0) tile on the Homepage. This auto numbered id value is still unique enough to target the elements under this div and apply custom styles using css selectors (e.g.: make the 'Financial Account' tile title appear in red color, etc.). But this assumes that the end users or even the administrators will not change the order of the tiles either via Personalizations or via administrative pages (structure and content). If such events occur, then it would be a bit complex to apply a style class targeted to a specific tile. This was the main reason I created an Idea on My Oracle Support to request this ability as a PeopleTools enhancement.

    With this background, I got really excited when I saw that we could potentially use the Tile Wizard API for applying targeted styles to a tile using the TileID and the TileSpecificStyleSheet properties of the Tile Wizard Class.

    Environment Details:
    - CS 9.2
    - PUM Image 4
    - PeopleTools 8.55.12

    TileID Property Quirk:

    But first, I found some quirky behavior with the TileID property. When I tried to set the TileID for the custom tile 'My Team' which I created in Part 2, it did not really update the id attribute on any of the elements that are part of the Tile. Instead the value was added to the class of the Tile Content area. This appears to be a bug from my understanding. If you are finding different results then please leave a comment with your experience!

    PeopleCode:


    We can see that the id attribute of the tile - where we would have expected the update - is still unchanged, whereas strangely the value is added to the class of the Tile Content area. Bug?

    Using the TileSpecificStyleSheet Property:

    While it is evident with the name of this property that it is specific to a tile, it does not necessarily mean that it will only be applied to the target tile. Basically, the style sheet is added to the response which may or may not be specific to the target tile depending on the style class selectors in the style sheet.

    Let us say we added a custom style sheet to the 'My Team' tile using the TileSpecificStyleSheet property.


    Scenario 1:

    Let us add the following style to the freeform style sheet to set a different color to the Tile Title.

    SV_TILE_CSS Style Sheet:


    Results:

    We can see that all the tiles on the homepage are affected by this style class. This is because the style class does not have any targeted css selectors and therefore will be applied to all tiles on the homepage.


    Scenario 2:

    Let us add another style - this time specifically targeting the 'My Team' tile using css selectors - to change the color of the Live Data text.

    SV_TILE_CSS Style Sheet:


    Results:


    Overall, while there are workarounds, it would be great if the TileID property works as expected (perhaps in the future releases of PeopleTools?) which would allow us to easily write custom style classes to accurately and effectively target specific tiles.

    LinkedIn-style Smart Notifications in PeopleSoft: Integrating FavIcon and Page Title with Push Notifications

    $
    0
    0
    As part of the latest wave of changes that were done to the LinkedIn UI, I noticed that they also made a change to their FavIcon. The FavIcon alerts us if there is a new notification. Of course, the Page Title also shows us the number of new notifications similar to most modern websites (Twitter, Facebook, etc.). This is great feature especially when we are off "working" on other browser tabs to grab our attention.


    Push Notification Framework has been part of PeopleSoft since PeopleTools 8.54 release. So, why not integrate the FavIcon and the Page Title with Push Notifications? This will help the users to return to their work if they receive a notification. Perhaps a UX/UI productivity feature?

    Demo:

    Here is a demo of how we can subscribe to the Push Notification events and dynamically update the FavIcon and the Page Title.


    Environment Details:
    - CS 9.2
    - PUM Image 4
    - PeopleTools 8.55.12

    Step 1: Create a Custom FavIcon in Classic and Fluid

    I wrote about this topic in the past (as part of my Branding articles). Currently, there is no delivered option to use a custom FavIcon in Classic and Fluid consistently.

    Refer: Overriding FavIcon

    Related Posts and Reference Documents:
    PeopleTools 8.55+ - Using Oracle JET Series: Part 1, Part 2, Part 3 and Part 4
    Global JavaScript Injection Framework
    My Oracle Support > E-PIA: Does PeopleSoft Use Favicon ? (Doc ID 1226503.1)
    My Oracle Support > E:FLUID- How To Access Favicon On Fluid Landing Pages? (Doc ID 2004996.1)

    Step 2: Create a custom JavasScript to Subscribe to Push Notifications

    JavaScript Object: CSK_SUB_PN_JS


    Notes:

    The script contains three main parts
    - cskSmartFavIcon function takes care of replacing the custom FavIcon with an alternative custom alert FavIcon. It also takes care of pre-pending the Page Title with the notification counter in (n) format.
    - The Push Notifications - Subscribe function is used to subscribe to the desired Push Notifications events.
    - Finally, cskFavIconPNJS function (called from PTPN_NOTIFICATION_MSG_JS > DoNotify function) takes care of toggling the FavIcon and the Page Title when the user has clicked on the Notification Icon.

    Step 3: Inject CSK_SUB_PN_JS globally across the application

    As mentioned in reference documents in Step 1, I used my custom framework to inject CSK_SUB_PN_JS globally.


    Step 4: Update delivered JS - PTPN_NOTIFICATION_MSG_JS

    This will take care of toggling the FavIcon and resetting the Page Title when the user clicks on the Notification Icon.


    Viewing all 132 articles
    Browse latest View live


    <script src="https://jsc.adskeeper.com/r/s/rssing.com.1596347.js" async> </script>