PeopleTools 8.54 has been around for a while now and it is about time that we jump on the Fluid UI bandwagon as there are more and more delivered Fluid Components that are made available.
Before we get started though, we obviously need to review the Branding on the Fluid Pages to make sure that it is consistent with our organization's Branding theme and not referencing any Oracle delivered colors, images and styles.
This post is intended to provide high level guidelines to help with achieving a consistent Branding experience in Fluid Homepages and Fluid Content pages. I titled this post as Part 5A because I would like to follow up with a
if I missed anything right now.
At the time of writing this post, I am using HCM 9.2 PUM Image 12 (PeopleTools 8.54.08).
If you have been following my previous multi-part series on PeopleTools 8.54+ Branding (
), then you would find that I most recently cloned the theme DEFAULT_THEME_TANGERINE_ALT as CSK_THEME_TANGERINE_ALT in a HCM 9.2 PUM Image 12 environment (refer
). This was to keep it consistent with the Fluid UI and also bring in additional features like the NavBar into the Classic Branding Header.
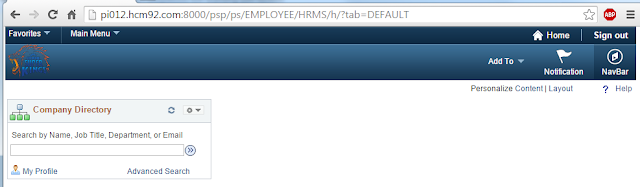
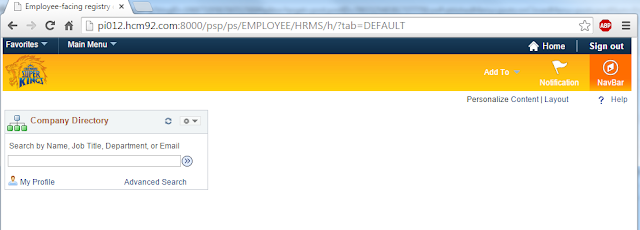
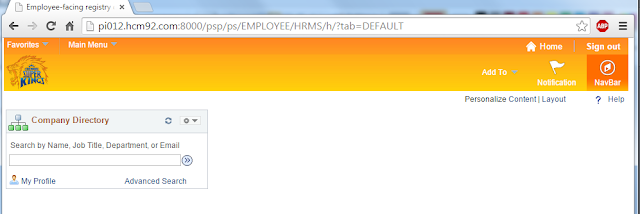
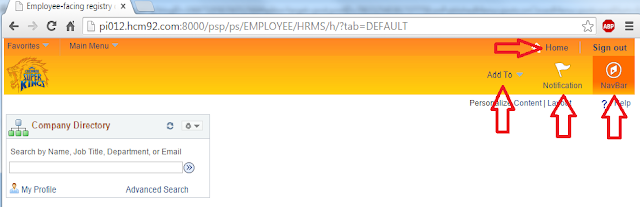
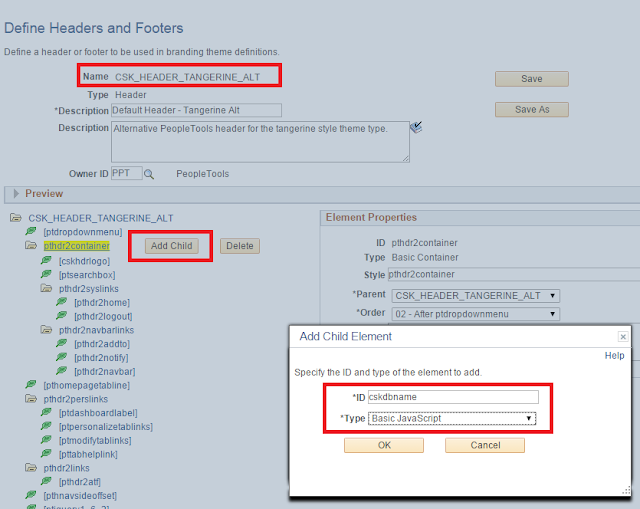
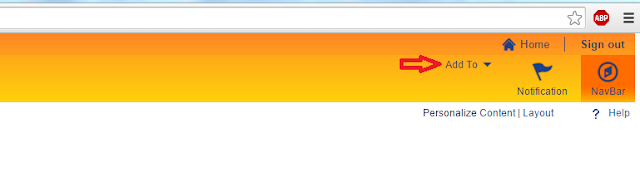
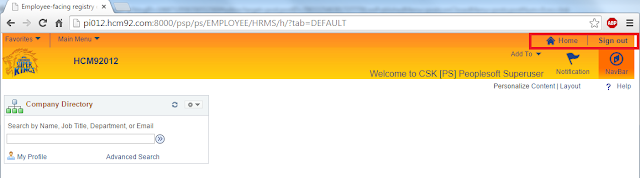
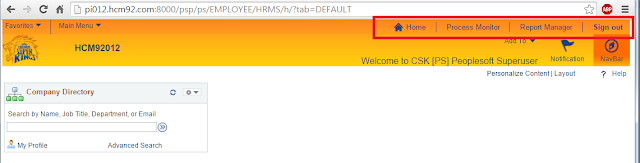
End result of using CSK_THEME_TANGERINE_ALT for the Classic Branding would appear as shown in the following screenshot.
We can see that the NavBar and other new icons are available on the Classic Branding Header. All is good - as of now! Enter Fluid UI!!!
Either click on the NavBar and select Fluid Home or navigate from Main Menu > Fluid Home.
Very well! Let us move along and try to override the Oracle Logo on the Fluid Homepage.
Since Fluid Branding is essentially at the component level, we might be switching back and forth between configuration and customizations (using App Designer). So dust off your "developer hats" as you might need them intermittently.
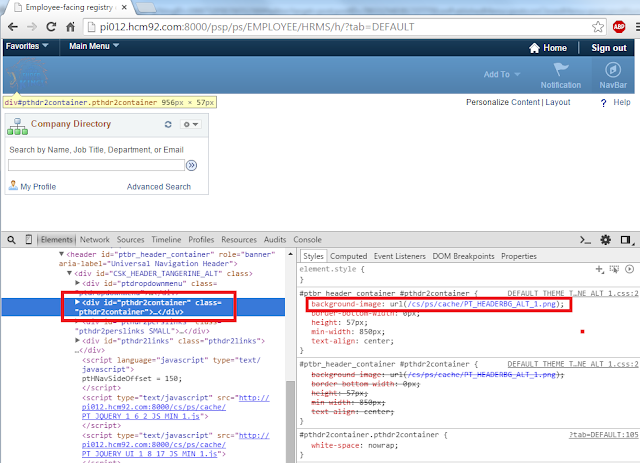
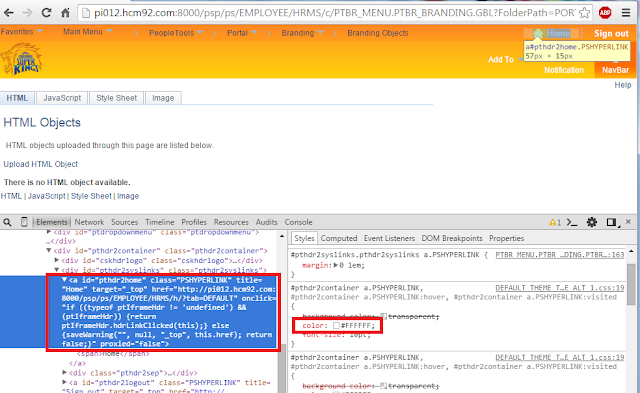
Update Fluid Homepage Logo:To update the logo for the Fluid Homepage Logo, we must first understand where it is coming from. We can see in the following screenshot that the image is getting generated as part of a page field PTNUI_LP_HEADER.PTNUI_LOGO (Component: PT_LANDINGPAGE, Page: PT_LANDINGPAGE).
Now that we know where the logo is coming from, we just need to update the page field properties to reference the appropriate custom image.
Speaking of images, you will notice that the delivered image that is used for the Fluid Homepage Logo is a SVG (
Scalable Vector Graphics) image. This again is another great move by Oracle to adopt SVG images particularly for the responsive Fluid UI. I don't want to go into too much of the details of SVG images but as you start using them you will notice that you can very easily modify the images (by editing the XML of the SVG using a text editor) without having to use software/editors like PhotoShop.
That said, let us upload a custom image to replace the delivered logo for the Fluid Homepage. Note: I am using a SVG image for my Fluid Homepage logo. For best results and scaling it is highly recommended that we move towards using SVG images.
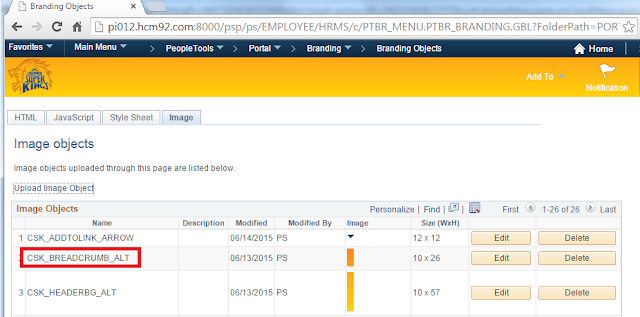
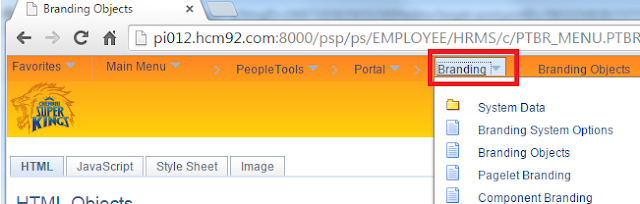
Navigation: Main Menu > PeopleTools > Portal > Branding > Branding Objects
You could also do this using App Designer but always a good idea to have these Branding Objects configurable online.
Now that we have the logo uploaded, let us open App Designer to update the image referenced and replace with the custom logo.
App Designer > File > Open > Page > Select: PTNUI_LP_HEADER
On PTNUI_LP_HEADER Page, open the Page Field PTNUI_LP_HEADER.PTNUI_LOGO and update the properties to appropriate custom values and 'Save' the page:
- Label Tab > Alt tag for image (Type and Text)
- Label Image > Image ID
Test Changes:Recommendations if you are experiencing caching issues.
- Clear local browser cache.
- Shutdown, purge and reboot the web server(s).
We can see that the delivered logo on the Fluid Homepage is now replaced with the custom logo. Although we are making progress, the image does not look great due to the background color. Let us see how we can go about applying a few style sheet overrides to further customize the Fluid Branding.
Notes:- I found that SVG images and their usage in Responsive Web Design (RWD) is a very interesting topic. There are plenty of online resources and content that provide a lot of information and opinions. Here is one of the many articles that I enjoyed reading: http://www.smashingmagazine.com/2014/03/05/rethinking-responsive-svg/
- I am sure some of you (just like me) might be wondering why we need to fall back to customizing objects in App Designer particularly with all the configurations that has helped us with Branding the Classic Homepage/UI? I gave this quite some thought. I was trying to see if there are easy options to override the image using CSS without too much overhead. I see some options of using Javascript or JQuery to perform these overrides but the question is "Is the juice worth the squeeze?". Right now, for the sake of simplicity and providing a proof of concept I decided to update the images using App Designer. In more complex use cases, we might need to dynamically change these images. For example, an environment with different themes for different user types such as Manager Self Service, Employer Self Service, etc. I plan to research this topic further and write a separate article on it if I find a good way to approach this requirement. If anyone has any suggestions then please feel free to leave a comment!
Getting ready to override Fluid Styles:Before we go ahead and start applying custom style sheet overrides for Fluid UI/Branding, we need to do a few housekeeping tasks so that our custom style sheet(s) get injected while the Fluid Pages are rendered.
Step 1: Create Custom Style Sheet(s)
Navigation: Main Menu > PeopleTools > Portal > Branding > Branding Objects > Style Sheet (Tab)
Upload your style sheet(s) as appropriate. For now, I am just creating a place holder style sheet to first complete the housekeeping activities.
Step 2: Applying Custom Style Sheet as an Override for Fluid Components on the Theme Definition
Navigation: Main Menu > PeopleTools > Portal > Branding > Assemble Themes
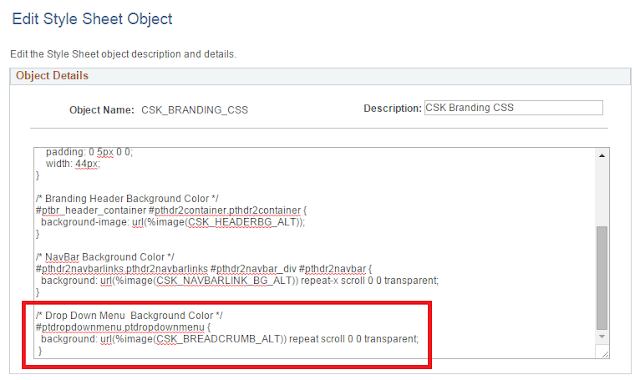
In my case, I updated the theme CSK_THEME_TANGERINE_ALT because that is the "current" theme definition referenced in my Branding System Options. You can see that I assigned the new style CSK_FLUID_CSS as the Global Override Style Sheet (in the Fluid Components section). This configuration would inject the custom style sheet while rendering Fluid pages globally. We could also use the Theme Style Sheet Mapping at the node level but that would be an advanced topic which I don't intend to cover in this post (could be handy for interaction hub scenarios where there are multiple applications).
Now that we set the above configuration in place, we can add styles to the custom style sheet (CSK_FLUID_CSS) to override the delivered fluid styles.
Overriding the Fluid Header Bar Background Color:Let us change the background color of the Fluid Header Bar by adding the following style class to CSK_FLUID_CSS.
/* Fluid Header Bar Background Color */
.ps_header-banner, .ps_header_bar {
%BV(background-image:linear-gradient(rgb(240, 238, 80),rgb(219, 204, 47)));
}
Navigation: Main Menu > PeopleTools > Portal > Branding > Branding Objects > Style Sheet (Tab)
Update the style sheet CSK_FLUID_CSS:Test Changes:Recommendations if you are experiencing caching issues.
- Clear local browser cache.
- Shutdown, purge and reboot the web server(s).
Notes:- %BV is a new Meta-HTML function delivered in PT 8.54 that would expand the generic style into a browser specific style and add the browser specific prefix to the CSS property value.Refer: PeopleBooks.
- linear-gradient is a CSS3 Gradient property that allows us to provide a smooth transition of two or more colors. This allows us to use css for background colors instead of using images. Refer: W3Schools.
Update Hover Over, Active Background Color for Home, Notification and Drop Down Menu Icons:If you hover over the Home, Notification, Drop Down Menu icons on the right hand side of the header you will notice that the background color for those icons need to be modified for the Hover Over and Active events.
Let us add the following styles to CSK_FLUID_CSS to override the delivered style.
/* Fluid Header - Hover Over, Active Background Color for Icons (Home, Notification, Drop Down Menu) */
.ps_header_bar .ps_box-button:not(.psc_disabled) .ps-button:hover
{
background-color: #F0EE50;
%BP(box-shadow:none);
}
.ps_header_bar .ps_box-button:not(.psc_disabled) .ps-button:active,
.ps_header_bar .ps_box-button:not(.psc_disabled) .ps-button:hover:active
{
background-color: #F0EE50;
%BP(box-shadow:none);
}
.ps_header_bar .ps_box-button:not(.psc_disabled) .ps-button:hover
{
background-color: #F0EE50;
%BP(box-shadow:none);
}
Navigation: Main Menu > PeopleTools > Portal > Branding > Branding Objects > Style Sheet (Tab)
Update the style sheet CSK_FLUID_CSS:Test Changes:Recommendations if you are experiencing caching issues.
- Clear local browser cache.
- Shutdown, purge and reboot the web server(s).
You can see how the hover over background color for the Home icon has changed to a more desirable custom color!
Notes:- %BP similar to %BV is a new Meta-HTML function delivered in PT 8.54 that would expand the generic style into a browser specific style and add the browser specific prefix to the CSS property name.Refer: PeopleBooks.
- box-shadow is a CSS3 property that attaches one or more shadows to an element. Refer: W3Schools.
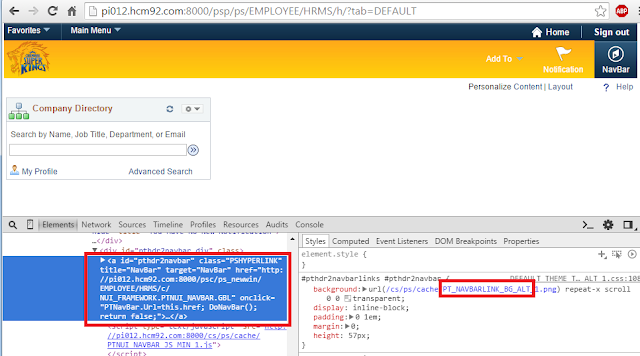
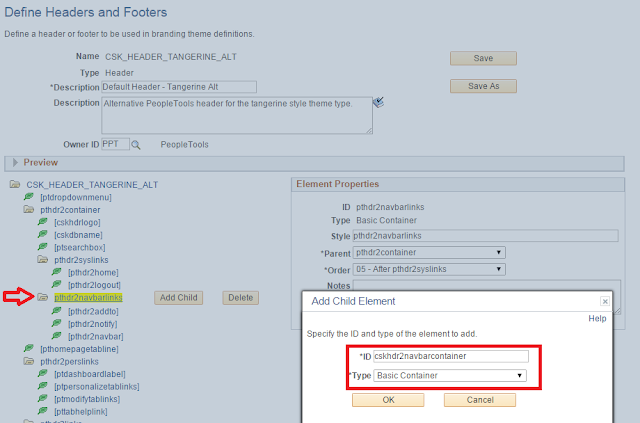
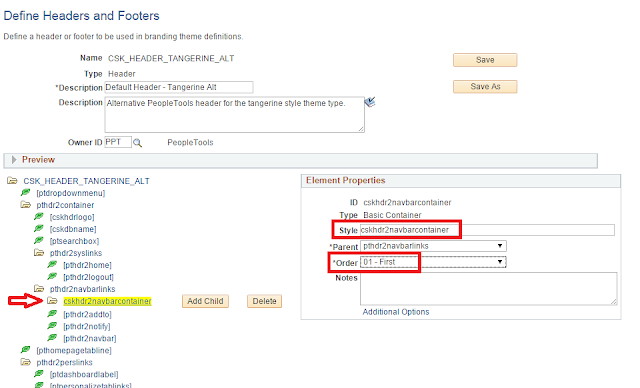
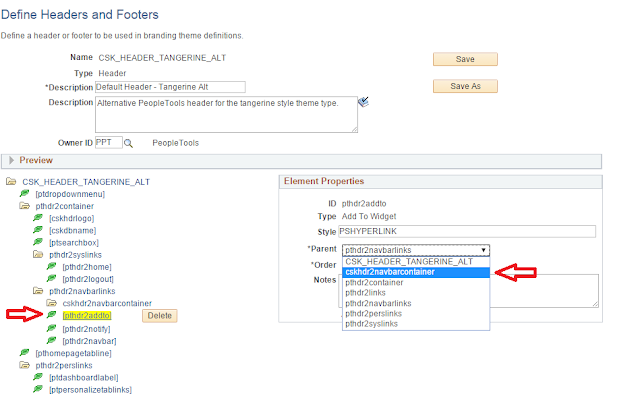
Update NavBar Icon Background and Hover Over Background Color:We can see that the NavBar icon is still using a different background color. Let us add some styles to CSK_FLUID_CSS to override the delivered styles.
/* Fluid Header - NavBar Background Color */
.ps_header_bar .ps_actions_cont .ps_system_cont .ps_header-navbar .ps-button {
%BV(background-image:linear-gradient(rgb(240, 238, 80),rgb(219, 204, 47)));
%BP(box-sizing:none);
}
/* Fluid Header - NavBar Hover Over Background Color */
.ps_header_bar .ps_actions_cont .ps_system_cont .ps_header-navbar .ps-button:hover {
background: #F0EE50;
%BP(box-shadow:none);
}
Navigation: Main Menu > PeopleTools > Portal > Branding > Branding Objects > Style Sheet (Tab)
Update the style sheet CSK_FLUID_CSS:Test Changes:Recommendations if you are experiencing caching issues.
- Clear local browser cache.
- Shutdown, purge and reboot the web server(s).
We can see that the NavBar icon background and hover over background colors have changed.
Notes:- box-sizing is a CSS3 property used to tell the browser what the sizing properties (width and height) should include. Refer: W3Schools.
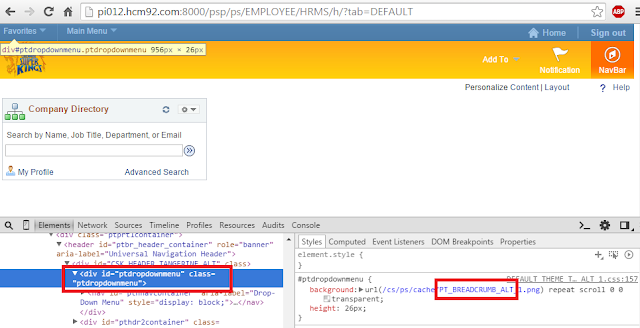
Update NavBar Icon Left Border:We can see from the screenshot above that there is still a left border on the NavBar icon. Let us update CSK_FLUID_CSS to take care of this.
/* Fluid Header - NavBar Background Color
and Border Left */
.ps_header_bar .ps_actions_cont .ps_system_cont .ps_header-navbar .ps-button {
border-left: 1px solid rgb(219, 205, 48); %BV(background-image:linear-gradient(rgb(240, 238, 80),rgb(219, 204, 47)));
%BP(box-sizing:none);
}
/* Fluid Header - NavBar Hover Over Background Color */
.ps_header_bar .ps_actions_cont .ps_system_cont .ps_header-navbar .ps-button:hover {
background: #F0EE50;
%BP(box-shadow:none);
}
Navigation: Main Menu > PeopleTools > Portal > Branding > Branding Objects > Style Sheet (Tab)
Update the style sheet CSK_FLUID_CSS:Test Changes:Recommendations if you are experiencing caching issues.
- Clear local browser cache.
- Shutdown, purge and reboot the web server(s).
Update the Fluid Landing Page - Background Color for the Content Portion:Let us now try to update the background color for the content portion (area where tiles are present) by adding the following style to CSK_FLUID_CSS.
/* Fluid Landing Page - Content Portion Background Color */
#PT_LANDINGPAGE .ps_content {
background-color: #E8E29E !important;
}
The reason why I used
!important rule above (which might not be best practice) is because the delivered style also has the
!important rule and the only way to override the delivered style is to use the
!important rule again.
Navigation: Main Menu > PeopleTools > Portal > Branding > Branding Objects > Style Sheet (Tab)
Update the style sheet CSK_FLUID_CSS:Test Changes:Recommendations if you are experiencing caching issues.
- Clear local browser cache.
- Shutdown, purge and reboot the web server(s).
We can see that the background color of the content area has changed. But there is still a blue line (bottom header) between the Branding Header and the content area. Let us fix that in the next section.
Update Fluid Header Bottom Border:Let us add the following style to CSK_FLUID_CSS to take care of this.
/* Fluid Landing Page - Header Border Bottom */
.ps_header_bar {
border-bottom: 1px solid rgb(240, 238, 80);
}
Navigation: Main Menu > PeopleTools > Portal > Branding > Branding Objects > Style Sheet (Tab)
Update the style sheet CSK_FLUID_CSS:Test Changes:Recommendations if you are experiencing caching issues.
- Clear local browser cache.
- Shutdown, purge and reboot the web server(s).
Update Fluid Landing Page - Homepage Drop Down Text Color:Let us now add the following style to update the color of the Homepage Drop Down text color.
/* Fluid Landing Page - Homepage Drop Down Text Color */
.nuihdr_hpbtn > span > a > span.ps-text {
color: #1d418c;
}
Navigation: Main Menu > PeopleTools > Portal > Branding > Branding Objects > Style Sheet (Tab)
Update the style sheet CSK_FLUID_CSS:Test Changes:Recommendations if you are experiencing caching issues.
- Clear local browser cache.
- Shutdown, purge and reboot the web server(s).
Update Fluid Landing Page - Footer Background Color:/* Fluid Landing Page - Footer Background Color */
.lpfooter {
background-color: transparent;
background: rgba(216, 206, 93, 0.8);
}
Navigation: Main Menu > PeopleTools > Portal > Branding > Branding Objects > Style Sheet (Tab)
Update the style sheet CSK_FLUID_CSS:Test Changes:Recommendations if you are experiencing caching issues.
- Clear local browser cache.
- Shutdown, purge and reboot the web server(s).
Notes:- rbga is a new feature in CSS3 where 'a' parameter/property stands for alpha. It allows us to specify the opacity of the color. Refer: W3Schools. You can see that the footer background color is slightly transparent because the alpha property is set to 0.8.
Update Fluid Landing Page - Footer Dot Styling:/* Fluid Landing Page - Footer Dot Styling */
.lpfooter .dot.on {
background: #EEEB4D;
}
.lpfooter .dot {
background: #E8E29E;
border: 2px solid #1d418c;
}
Navigation: Main Menu > PeopleTools > Portal > Branding > Branding Objects > Style Sheet (Tab)
Update the style sheet CSK_FLUID_CSS:Test Changes:Recommendations if you are experiencing caching issues.
- Clear local browser cache.
- Shutdown, purge and reboot the web server(s).
Update Fluid Homepage - Icons:
You can see that there are several icons on the Fluid Homepage - Home, Notification, Drop-Down Action Menu (hamburger icon), NavBar, Homepage Selection Drop-Down Arrow and Footer Refresh - that don't seem to share the same theme as that of our custom CSK theme.
Let us see how we can update these icons to be consistent with our custom theme.
Home Icon:
The home icon is generated by the page field PT_WORK.PT_BUTTON_HOME (Header Page: PT_HEADERPAGE) as part of the Push Button > Label Image Property.
You will notice that the image PT_HEADER_HOME is actually in SVG format. As I have previously mentioned, I am really excited at the prospects of using SVG images. One of the primary reasons aside from the general benefits of using scalable images in RWD is that I find it extremely easy to modify them using a text editor. Previously, modifying images for Branding would require a significant effort and involves using image editing tools such as Photoshop.
To take a look at the image, export the object PT_HEADER_HOME from App Designer (File > Export Image) to your computer and then open the image in a text editor. You will see the following XML:
<?xml version="1.0" encoding="utf-8"?>
<!-- Generator: Adobe Illustrator 15.0.0, SVG Export Plug-In . SVG Version: 6.00 Build 0) -->
<svg version="1.1" id="Layer_1" xmlns="http://www.w3.org/2000/svg" xmlns:xlink="http://www.w3.org/1999/xlink" x="0px" y="0px"
width="25px" height="25px" viewBox="0 0 25 25" enable-background="new 0 0 25 25" xml:space="preserve">
<g>
<path opacity="0.35" fill="#231F20" d="M22.3,15.3l-9.8-9.8l-9.8,9.8L0,12.7L12.5,0.2L25,12.7L22.3,15.3z M2,12.7l0.7,0.7l9.8-9.8
l9.8,9.8l0.7-0.7L12.5,2.1L2,12.7z"/>
<path opacity="0.35" fill="#231F20" d="M21.3,24.8h-6.9v-5h-3.9v5H3.7V14.4l8.8-8.8l8.8,8.8V24.8z M15.8,23.5H20v-9.1l-7.5-7.3
l-7.5,7.3v9.1h4.1v-5h6.6V23.5z"/>
<polygon fill="#FFFFFF" points="12.5,4.5 22.3,14.3 24,12.7 12.5,1.1 1,12.7 2.7,14.3 "/>
<polygon fill="#FFFFFF" points="12.5,6.1 4.4,14.1 4.4,24.1 9.9,24.1 9.9,19.2 15.1,19.2 15.1,24.1 20.6,24.1 20.6,14.1 "/>
</g>
</svg>Replace #FFFFFF (Hex for White - delivered home icon color) to #1d418c (desired custom color) and save the file as CSK_HEADER_HOME (custom home icon).
<?xml version="1.0" encoding="utf-8"?>
<!-- Generator: Adobe Illustrator 15.0.0, SVG Export Plug-In . SVG Version: 6.00 Build 0) -->
<svg version="1.1" id="Layer_1" xmlns="http://www.w3.org/2000/svg" xmlns:xlink="http://www.w3.org/1999/xlink" x="0px" y="0px"
width="25px" height="25px" viewBox="0 0 25 25" enable-background="new 0 0 25 25" xml:space="preserve">
<g>
<path opacity="0.35" fill="#231F20" d="M22.3,15.3l-9.8-9.8l-9.8,9.8L0,12.7L12.5,0.2L25,12.7L22.3,15.3z M2,12.7l0.7,0.7l9.8-9.8
l9.8,9.8l0.7-0.7L12.5,2.1L2,12.7z"/>
<path opacity="0.35" fill="#231F20" d="M21.3,24.8h-6.9v-5h-3.9v5H3.7V14.4l8.8-8.8l8.8,8.8V24.8z M15.8,23.5H20v-9.1l-7.5-7.3
l-7.5,7.3v9.1h4.1v-5h6.6V23.5z"/>
<polygon fill="#1d418c" points="12.5,4.5 22.3,14.3 24,12.7 12.5,1.1 1,12.7 2.7,14.3 "/>
<polygon fill="#1d418c" points="12.5,6.1 4.4,14.1 4.4,24.1 9.9,24.1 9.9,19.2 15.1,19.2 15.1,24.1 20.6,24.1 20.6,14.1 "/>
</g>
</svg>Now I have my own CSK Home icon. Here is how it looks when I open the image (use any browser).
You can see how easy it is to modify the image. Now let us update PT_WORK.PT_BUTTON_HOME page to reference this custom SVG image.
Test Changes:Recommendations if you are experiencing caching issues.
- Clear local browser cache.
- Shutdown, purge and reboot the web server(s).
Notification, Drop-Down Action Menu (Hamburger) and NavBar Icons:Similarly, we can clone the following delivered SVG images:
Notification: PT_HEADER_ALERTS > CSK_HEADER_ALERTS
Action Menu: PT_HEADER_ACTIONS > CSK_HEADER_ACTIONS
NavBar: PT_HEADER_NAVBAR > CSK_HEADER_NAVBAR
Update page field PT_WORK.PT_BUTTON_NOTIFY (Header Page: PT_HEADERPAGE) to replace PT_HEADER_ALERTS with CSK_HEADER_ALERTS.
Update page field PTLAYOUT.HEADER_ACTIONGROUP (Subpage: PT_HEADER_ACTION) to replace PT_HEADER_ACTIONS with CSK_HEADER_ACTIONS.
Update page field PT_WORK.PT_BUTTON_NAVBAR (Header Page: PT_HEADERPAGE) to replace PT_HEADER_NAVBAR with CSK_HEADER_NAVBAR.
Test Changes:Recommendations if you are experiencing caching issues.
- Clear local browser cache.
- Shutdown, purge and reboot the web server(s).
Homepage Selection Drop-Down Arrow Icon:The Fluid homepage selection drop-down arrow icon is generated by the page field PTNUI_LAND_WRK.GROUPBOX14 (Subpage: PTNUI_SELLP_POP) as part of the Group Box Use Properties > Display Options > Label Image for Collaped State.
We can see that PTNUI_DOWN_ARW image is a PNG. To keep all the icon image formats consistent I decided to use a SVG image for all the custom icons. I found a Down Arrow SVG image online which has the following XML:
<?xml version="1.0" encoding="iso-8859-1"?>
<!-- Generator: Adobe Illustrator 16.0.0, SVG Export Plug-In . SVG Version: 6.00 Build 0) -->
<!DOCTYPE svg PUBLIC "-//W3C//DTD SVG 1.1//EN""http://www.w3.org/Graphics/SVG/1.1/DTD/svg11.dtd">
<svg version="1.1" id="Capa_1" xmlns="http://www.w3.org/2000/svg" xmlns:xlink="http://www.w3.org/1999/xlink" x="0px" y="0px"
width="14px" height="10px" viewBox="0 0 404.308 404.309" style="enable-background:new 0 0 404.308 404.309;"
xml:space="preserve" fill="#1d418c">
<g>
<path d="M0,101.08h404.308L202.151,303.229L0,101.08z"/>
</g>
</svg>Let us save this image as CSK_NUI_DOWN_ARW.SVG and update the page PTNUI_SELLP_POP to reference it.
Test Changes:Recommendations if you are experiencing caching issues.
- Clear local browser cache.
- Shutdown, purge and reboot the web server(s).
Homepage Footer Refresh Icon:The Fluid homepage footer refresh icon is generated by page field PTNUI_LP_FOOTER.REFRESH_BTN (Footer Page: PTNUI_LP_FOOTER) as part of the Push Button/Hyperlink > Label Image property.
PTNUI_REFRESH_ICN is also in PNG format as delivered. I found a refresh icon SVG image online with the following XML:
<?xml version="1.0" encoding="iso-8859-1"?>
<!-- Generator: Adobe Illustrator 16.0.0, SVG Export Plug-In . SVG Version: 6.00 Build 0) -->
<!DOCTYPE svg PUBLIC "-//W3C//DTD SVG 1.1//EN""http://www.w3.org/Graphics/SVG/1.1/DTD/svg11.dtd">
<svg version="1.1" id="Capa_1" xmlns="http://www.w3.org/2000/svg" xmlns:xlink="http://www.w3.org/1999/xlink" x="0px" y="0px"
width="23px" height="35px" viewBox="0 0 408 408" style="enable-background:new 0 0 408 408;" xml:space="preserve" fill="#1d418c">
<g>
<g id="refresh">
<path d="M346.8,61.2C311.1,22.95,260.1,0,204,0C91.8,0,0,91.8,0,204s91.8,204,204,204c94.35,0,173.4-66.3,196.35-153H346.8
C326.4,313.65,270.3,357,204,357c-84.15,0-153-68.85-153-153c0-84.15,68.85-153,153-153c43.35,0,79.05,17.85,107.1,45.9
l-81.6,81.6H408V0L346.8,61.2z"/>
</g>
</g>
</svg>Let us save this image as CSK_NUI_REFRESH_ICN.SVG and update the page PTNUI_LP_FOOTER to reference it.
Test Changes:Recommendations if you are experiencing caching issues.
- Clear local browser cache.
- Shutdown, purge and reboot the web server(s).
Now our Fluid Homepage has a completely custom look and feel. Let us take a look at any Fluid Content Page (e.g.: My Team under Manager Self Service) to make sure that the theme is consistent.
We can see that there is still a little bit more work to be done on the Fluid Content Page Header.
Fluid Content Page - Title Text Color:Let us add some additional styles to CSK_FLUID_CSS style sheet to address the page title text color.
/* Fluid Content Page(s) - Page Title Text Color */
.ps_header-banner, .ps_header_bar {
color: #1d418c;
}
Navigation: Main Menu > PeopleTools > Portal > Branding > Branding Objects > Style Sheet (Tab)
Update the style sheet CSK_FLUID_CSS:Test Changes:Recommendations if you are experiencing caching issues.
- Clear local browser cache.
- Shutdown, purge and reboot the web server(s).
Now the only thing that looks a bit odd is the 'Return to Homepage' Button on the Fluid Content Page. We will try to fix the look and feel of this button in the next section.
Fluid Content Page - 'Return to Homepage' Button:The Return button on the Fluid content pages is a combination of an image, text and push button/hyperlink styling.
Update Image:Let us first update the image which is generated by the page field PT_WORK.PT_BUTTON_BACK (Subpage: PT_HEADERPAGE) as part of Push Button/Hyperlink > Label Image Property.
PT_NUI_BACK_PRIM_IMG is delivered in SVG format. We can update the XML of this SVG as appropriate:
<?xml version="1.0" encoding="utf-8"?>
<!-- Generator: Adobe Illustrator 15.0.0, SVG Export Plug-In . SVG Version: 6.00 Build 0) -->
<svg version="1.1" id="Layer_1" xmlns="http://www.w3.org/2000/svg" xmlns:xlink="http://www.w3.org/1999/xlink" x="0px" y="0px"
width="18px" height="18px" viewBox="0 0 18 18" enable-background="new 0 0 18 18" xml:space="preserve">
<g>
<path fill="#F0EC12" d="M9,17.5c-4.7,0-8.5-3.8-8.5-8.5c0-4.7,3.8-8.5,8.5-8.5c4.7,0,8.5,3.8,8.5,8.5C17.5,13.7,13.7,17.5,9,17.5z"
/>
<path fill="#F2EE29" d="M9,1c4.4,0,8,3.6,8,8s-3.6,8-8,8s-8-3.6-8-8S4.6,1,9,1 M9,0C4,0,0,4,0,9s4,9,9,9s9-4,9-9S14,0,9,0L9,0z"/>
</g>
<polygon fill="#1d418c" points="7.8,9 11.6,5.1 9.9,3.5 4.3,9 9.9,14.5 11.7,12.9 "/>
</svg>Save the image as CSK_NUI_BACK_PRIM_IMG.SVG.
Update the page PT_HEADERPAGE to reference the custom image.
Test Changes:Recommendations if you are experiencing caching issues.
- Clear local browser cache.
- Shutdown, purge and reboot the web server(s).
Another test with lesser real estate on the page causing the image to scale (RWD styling).
Update CSS:Finally, let us see how we can apply some style overrides on the 'Return to Home' button.
/* Fluid Content Page(s) - Return Button */
.ps_box-button.ps_button_backnav .ps-button,
.ps_box-button.ps_button_backnav .ps-button:link,
.ps_box-button.ps_button_backnav .ps-button:not(.psc_disabled) .ps-button:hover,
.ps_box-button.ps_button_stdheader .ps-button,
.ps_box-button.ps_button_stdheader .ps-button:link,
.ps_box-button.ps_button_stdheader .ps-button:not(.psc_disabled) .ps-button:hover {
font-size: 0.95em;
box-shadow: inset 0 1px 0 0 #CBD015;
padding: 0.6em 1em 0.6em 0.5em;
border: 1px solid #F2EE29;
border-bottom-color: #F0EC12;
background-image: linear-gradient(rgb(240, 238, 80),rgb(219, 204, 47));
text-align: left;
display: inline-block;
}
.ps_header_bar .ps_box-button .ps-button, .ps_header_bar .ps_box-button .ps-button:link, .ps_header_bar .ps_box-button .ps-button:hover {
color: #1d418c;
font-size: 0.95em;
}
.ps_box-button.ps_button_backnav:not(.psc_disabled) .ps-button:hover,
.ps_box-button.ps_button_stdheader:not(.psc_disabled) .ps-button:hover
{
background-color: #F0EE50;
%BP(box-shadow:none);
background-image: none;
border-color: none;
border-image: none;
border-style: none;
border-width: none;
color: #1d418c;
}
.ps_box-button.ps_button_backnav:not(.psc_disabled) .ps-button:active,
.ps_box-button.ps_button_backnav:not(.psc_disabled) .ps-button:hover:active,
.ps_box-button.ps_button_stdheader:not(.psc_disabled) .ps-button:active,
.ps_box-button.ps_button_stdheader:not(.psc_disabled) .ps-button:hover:active
{
background-color: #F0EE50;
%BP(box-shadow:none);
background-image: none;
border-color: none;
border-image: none;
border-style: none;
border-width: none;
color: #1d418c;
}
The above CSS was identified as the styles that were affecting the 'Return to Home' button on the Fluid Content Page(s).
Update the style sheet CSK_FLUID_CSS:Test Changes:Recommendations if you are experiencing caching issues.
- Clear local browser cache.
- Shutdown, purge and reboot the web server(s).
Return Button:
Return Button Hover Action Style:
Return Button with page width less that 680 px (testing Responsive Styling):
We can see that although the button styling looks good for the original size and hover over action, it looks out of place for the responsive styling (smaller screen width). Let us see how we can fix this issue using some additional responsive styling.
Update CSS further:@media only screen and (max-width: 680px) {
.ps_header_bar .psc_hide-BP3 { display: none !important; }
.ps_menutype-act .psc_show-BP3:not(.psc_hidden) { display: block; }
.ps_header_bar .ps_button_backnav > .ps-button-wrapper > .ps-button > .ps-text {
display:none !important;
}
.ps_header_bar .ps_button_backnav > .ps-button-wrapper > .ps-button > .ps-img {
max-height:none !important;
height:1.8em;
width:1.8em;
padding:0;
}
.ps_header_bar .ps_button_backnav > .ps-button-wrapper > .ps-button {
padding:0.4em;
}
.ps_header_bar .ps_pagetitle > .ps-text { /*01A - Added for banner changes only */
max-width:49vw;
}
}
I found the above RWD related CSS in the delivered style sheet PSSTYLEDEF_FMODE. This seems to be controlling the background, background image scaling and text of the 'Return to Home' push button. So I included this in the custom CSK_FLUID_CSS to make sure that our custom style sheet is not inadvertently overriding the delivered style.
Update the style sheet CSK_FLUID_CSS:Test Changes:Recommendations if you are experiencing caching issues.
- Clear local browser cache.
- Shutdown, purge and reboot the web server(s).
You can see from the screenshot that the 'Return to Home' button is responsive to the screen width (less that 680 px).
This concludes Part 5A - Fluid Branding. I think we covered several Fluid Branding topics that should provide a good initial introduction and help us personalize and further customize the Fluid UI as per our own requirements.
Thanks for reading this article and as always I welcome all feedback and/or questions. Please feel free to let me know if anything stated in this post can be done in a better way!
I intend to follow up this post with other additional Fluid UI Branding and Customization techniques. Stay tuned for
Part 5B!
Updated on November 29th, 2015:Please review my latest posts on PeopleTools Fluid Branding:
PeopleTools 8.54+ - Branding - Part 5B - Fluid BrandingPeopleTools 8.54+ - Branding - Part 5C - Fluid Branding